> ## Documentation Index
> Fetch the complete documentation index at: https://docs.elasticfunnels.io/llms.txt
> Use this file to discover all available pages before exploring further.
# Email Sending Accounts
> Send order emails, campaigns, ticket replies and automation emails through your own Amazon SES, Postmark, Brevo or Resend account, and see how the sender address is picked.
A sending account is an email service you own that ElasticFunnels sends through. Besides your
SMTP server, Mailgun, SendGrid and Mailrelay, you can connect four API services:
| Service | What you paste | Good to know |
| - | - | - |
| **Amazon SES** | An IAM access key ID and secret, and the SES region | A configuration set is needed for opens, clicks and bounces |
| **Postmark** | A server API token | Order emails use the transactional stream, campaigns the broadcast stream |
| **Brevo** | Your Brevo API key | The same key also syncs contacts in automations |
| **Resend** | A Resend API key | A sending-only key is enough to send |
Each key is checked with the provider when you save. A key that the provider refuses is not saved.
## Where a sending account is used
| Email | Where you pick the account |
| - | - |
| Order and subscription emails | **Merchants** → the merchant → **Email** tab → **Email Integration**. Brand SMTP still wins when the brand has it. See [Sending Setup](/emails/sending-setup#alternative-a-per-merchant-email-integration). |
| Course emails | The course's email integration. |
| Campaigns | The campaign's **Settings** step, or **Connect a sending account** there. |
| Support ticket replies | Ticket settings → **Reply Using Integration**. |
| Automations | The **Send email** step's **Sending account**. See [Send email step](/automations/send-email). |
Members area login codes and links are the exception. They are sent by your pages, which send
only through brand SMTP, Mailgun, SendGrid or Mailrelay. Without one of those, ElasticFunnels
sends the login email under your brand name, as it does today.
A paused account sends nothing. For a ticket reply, the ticket source's own SMTP server is used
instead.
## Connect Amazon SES
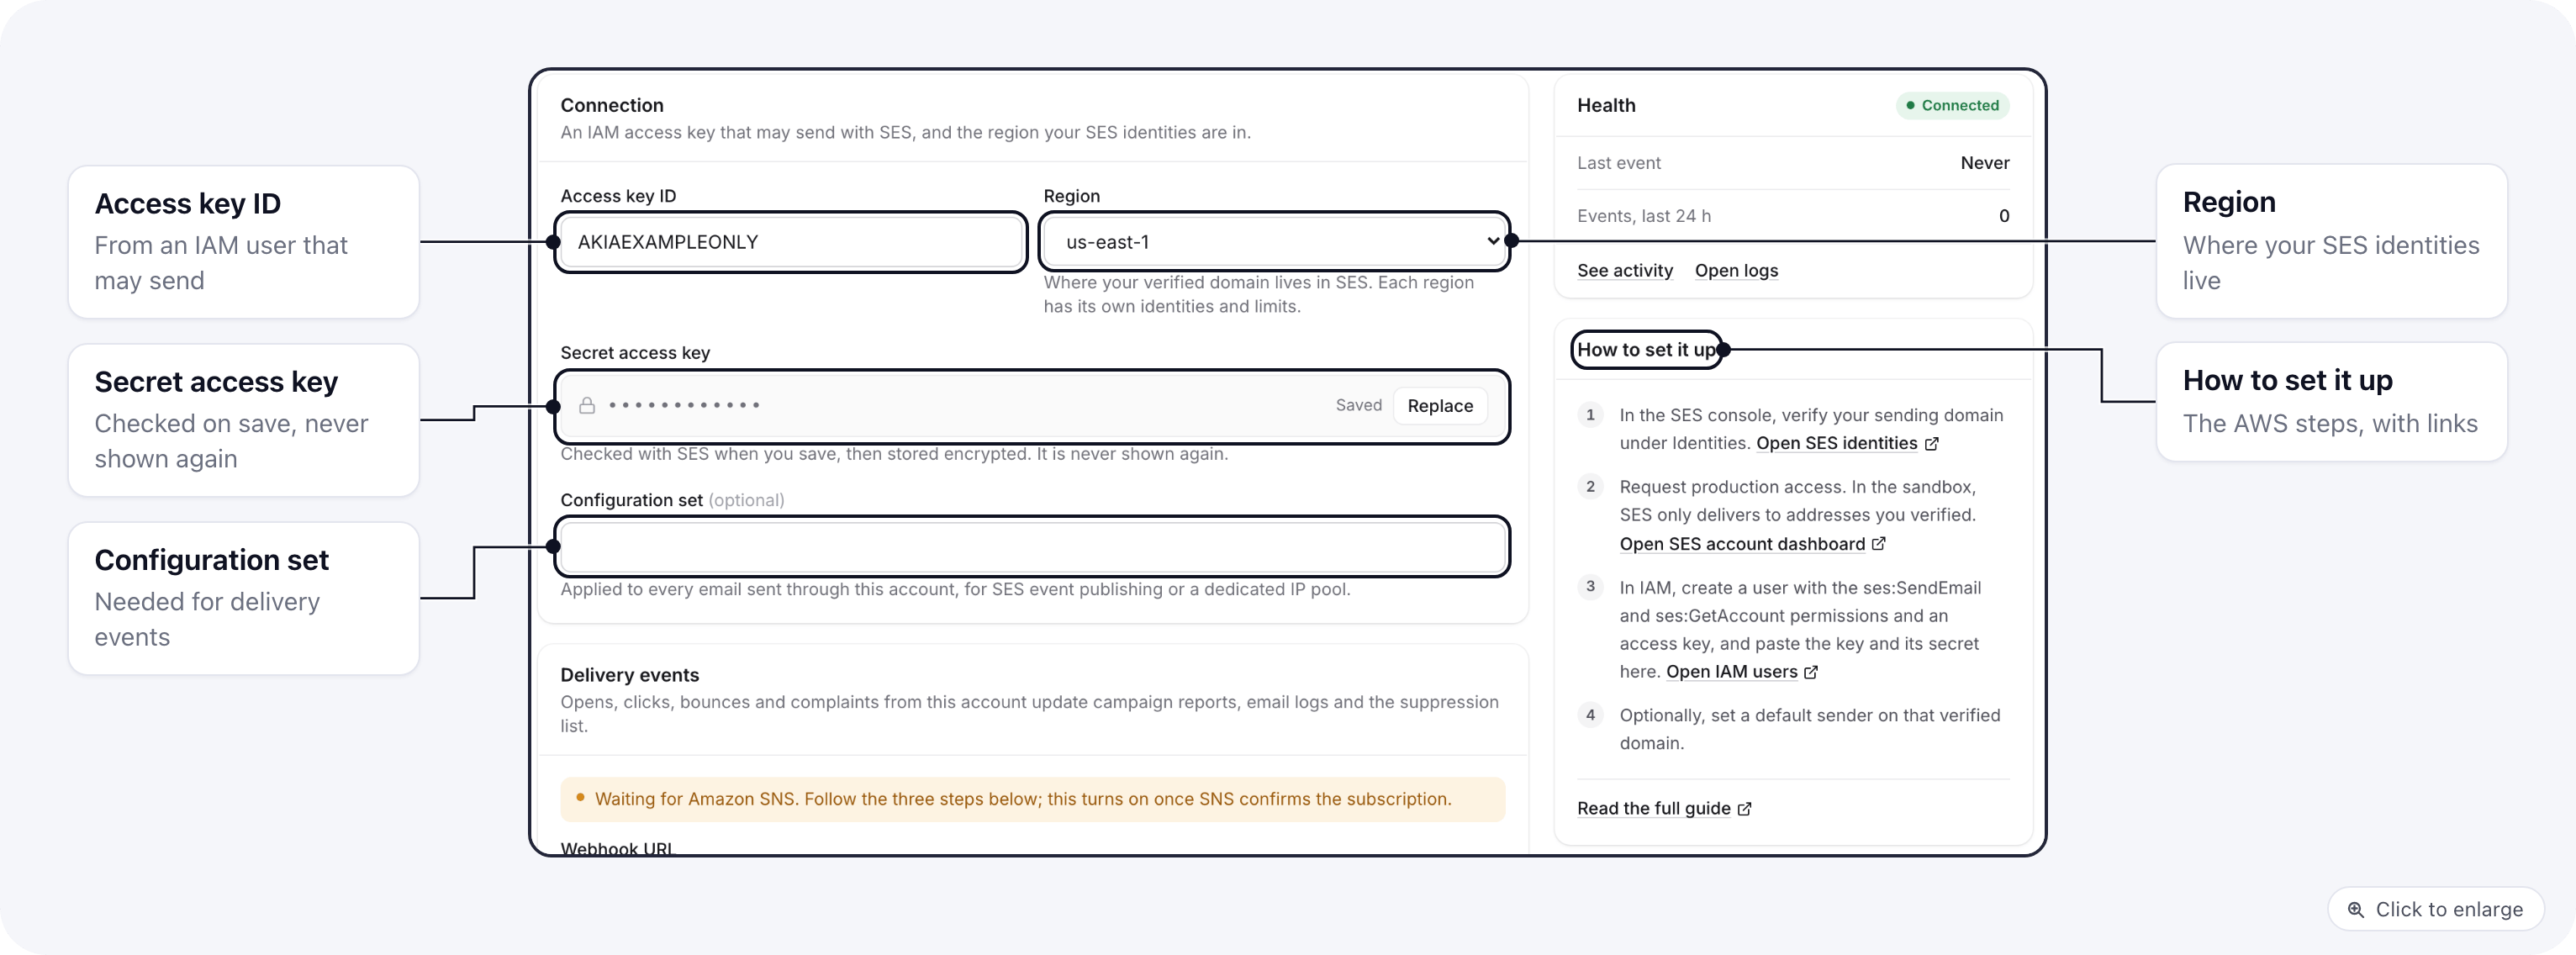 In the SES console, open **Identities** and verify the domain you send from. Do this in the
region you will pick below: each region has its own identities and limits.
Request production access on the SES account dashboard. In the sandbox, SES only delivers to
addresses you verified yourself.
In IAM, create a user with the `ses:SendEmail` and `ses:GetAccount` permissions, then create an
access key for it.
Go to **Apps → Integrations**, add **Amazon SES**, and paste the **Access key ID** and
**Secret access key**. Pick the **Region** your domain is verified in. The secret is checked with
SES when you save, stored encrypted and never shown again.
Type the name of an SES configuration set in **Configuration set**. It is applied to every email
sent through this account. You need one to get opens, clicks and bounces back, as
[Delivery events](/emails/delivery-events#amazon-ses-three-steps-in-aws) explains.
## Connect Postmark
In the SES console, open **Identities** and verify the domain you send from. Do this in the
region you will pick below: each region has its own identities and limits.
Request production access on the SES account dashboard. In the sandbox, SES only delivers to
addresses you verified yourself.
In IAM, create a user with the `ses:SendEmail` and `ses:GetAccount` permissions, then create an
access key for it.
Go to **Apps → Integrations**, add **Amazon SES**, and paste the **Access key ID** and
**Secret access key**. Pick the **Region** your domain is verified in. The secret is checked with
SES when you save, stored encrypted and never shown again.
Type the name of an SES configuration set in **Configuration set**. It is applied to every email
sent through this account. You need one to get opens, clicks and bounces back, as
[Delivery events](/emails/delivery-events#amazon-ses-three-steps-in-aws) explains.
## Connect Postmark
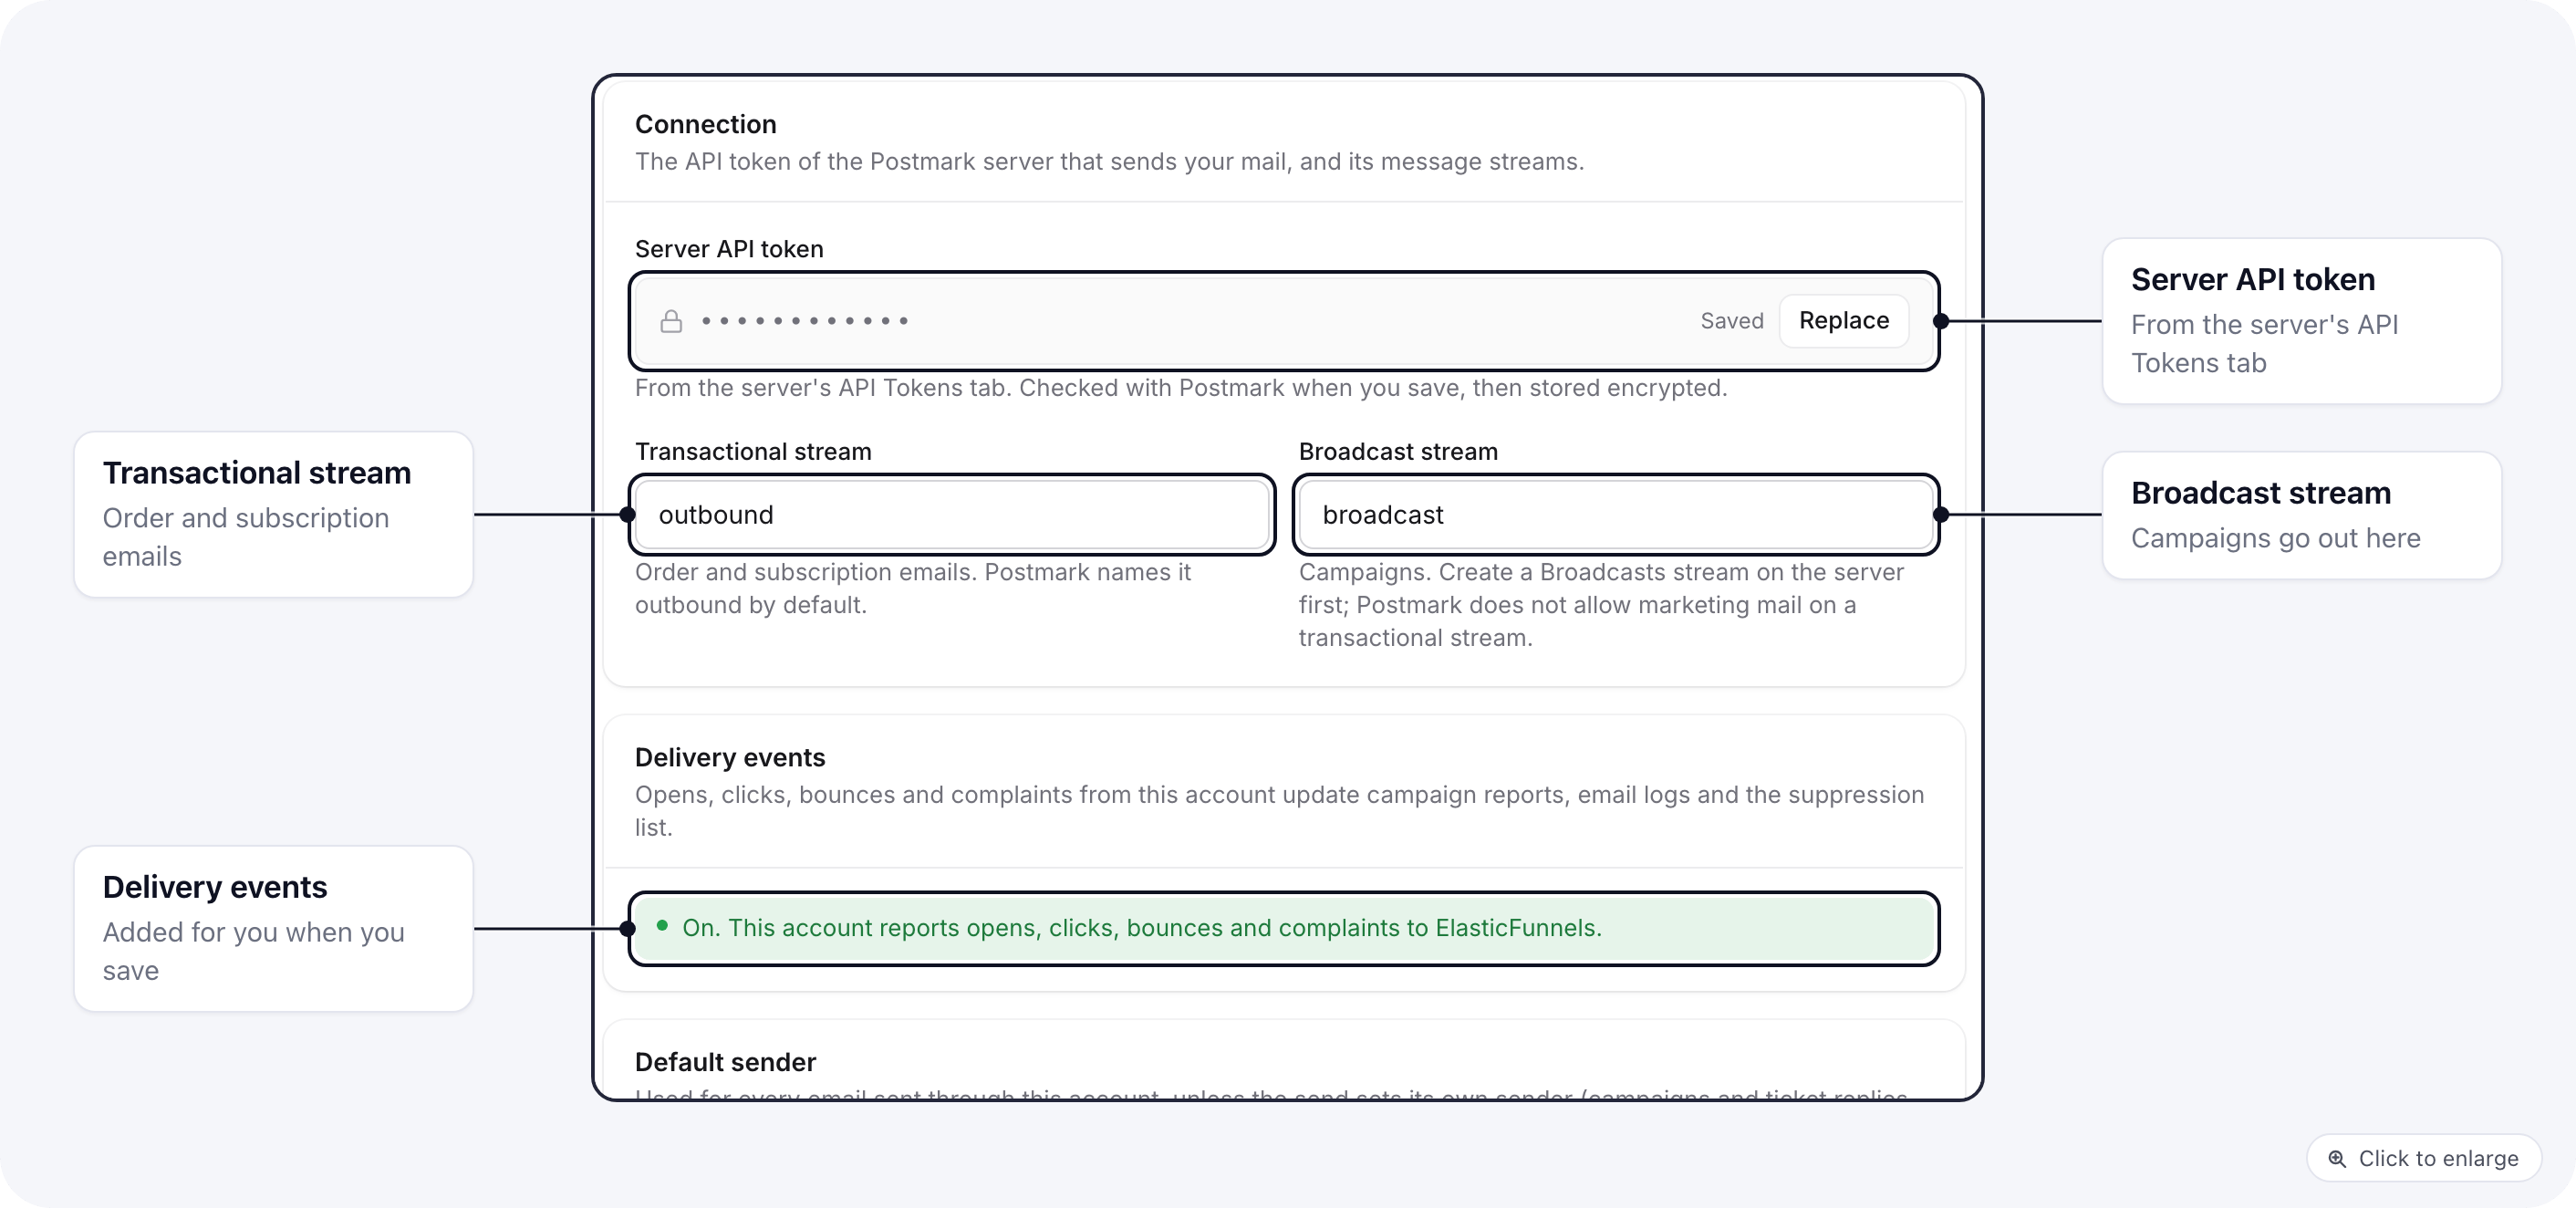 In Postmark, verify your sending domain under **Sender Signatures**.
On the server you send from, add a **Broadcasts** message stream if it has none. Postmark does
not allow marketing email on a transactional stream.
Open the server, copy a token from its **API Tokens** tab and paste it in **Server API token**.
**Transactional stream** carries order and subscription emails. Postmark calls it `outbound` by
default. **Broadcast stream** carries campaigns and defaults to `broadcast`. Change them only if
your server uses other names.
## Connect Brevo
Brevo uses one API key for everything. If you already connected Brevo to sync contacts, open that
connection: the same key now sends email too.
1. In Brevo, create an API key under **SMTP & API**. It starts with `xkeysib-`.
2. To send email, add a sender or authenticate your domain under **Senders & IP**.
3. Paste the key in **API key**, and optionally set a default sender that uses that verified
address or domain.
## Connect Resend
In Resend, add and verify your sending domain under **Domains**.
Create an API key under **API Keys** and paste it in **API key**. It starts with `re_`. A key
limited to sending is enough to send email.
With a full access key, ElasticFunnels adds the webhook for opens, clicks and bounces when you
save. With a sending-only key, you add the webhook in Resend yourself and paste its signing secret.
See [Delivery events](/emails/delivery-events#resend-with-a-sending-only-key).
## Default sender
Every account has a **Default sender** card: **Default From Email**, **Default From Name** and
**Default Reply-To Email**. All three are optional. The address you use must be verified with
that provider (a verified domain in SES or Resend, a confirmed sender signature or domain in
Postmark, a sender or authenticated domain in Brevo), or the provider refuses the email.
## How the sender is chosen
In Postmark, verify your sending domain under **Sender Signatures**.
On the server you send from, add a **Broadcasts** message stream if it has none. Postmark does
not allow marketing email on a transactional stream.
Open the server, copy a token from its **API Tokens** tab and paste it in **Server API token**.
**Transactional stream** carries order and subscription emails. Postmark calls it `outbound` by
default. **Broadcast stream** carries campaigns and defaults to `broadcast`. Change them only if
your server uses other names.
## Connect Brevo
Brevo uses one API key for everything. If you already connected Brevo to sync contacts, open that
connection: the same key now sends email too.
1. In Brevo, create an API key under **SMTP & API**. It starts with `xkeysib-`.
2. To send email, add a sender or authenticate your domain under **Senders & IP**.
3. Paste the key in **API key**, and optionally set a default sender that uses that verified
address or domain.
## Connect Resend
In Resend, add and verify your sending domain under **Domains**.
Create an API key under **API Keys** and paste it in **API key**. It starts with `re_`. A key
limited to sending is enough to send email.
With a full access key, ElasticFunnels adds the webhook for opens, clicks and bounces when you
save. With a sending-only key, you add the webhook in Resend yourself and paste its signing secret.
See [Delivery events](/emails/delivery-events#resend-with-a-sending-only-key).
## Default sender
Every account has a **Default sender** card: **Default From Email**, **Default From Name** and
**Default Reply-To Email**. All three are optional. The address you use must be verified with
that provider (a verified domain in SES or Resend, a confirmed sender signature or domain in
Postmark, a sender or authenticated domain in Brevo), or the provider refuses the email.
## How the sender is chosen
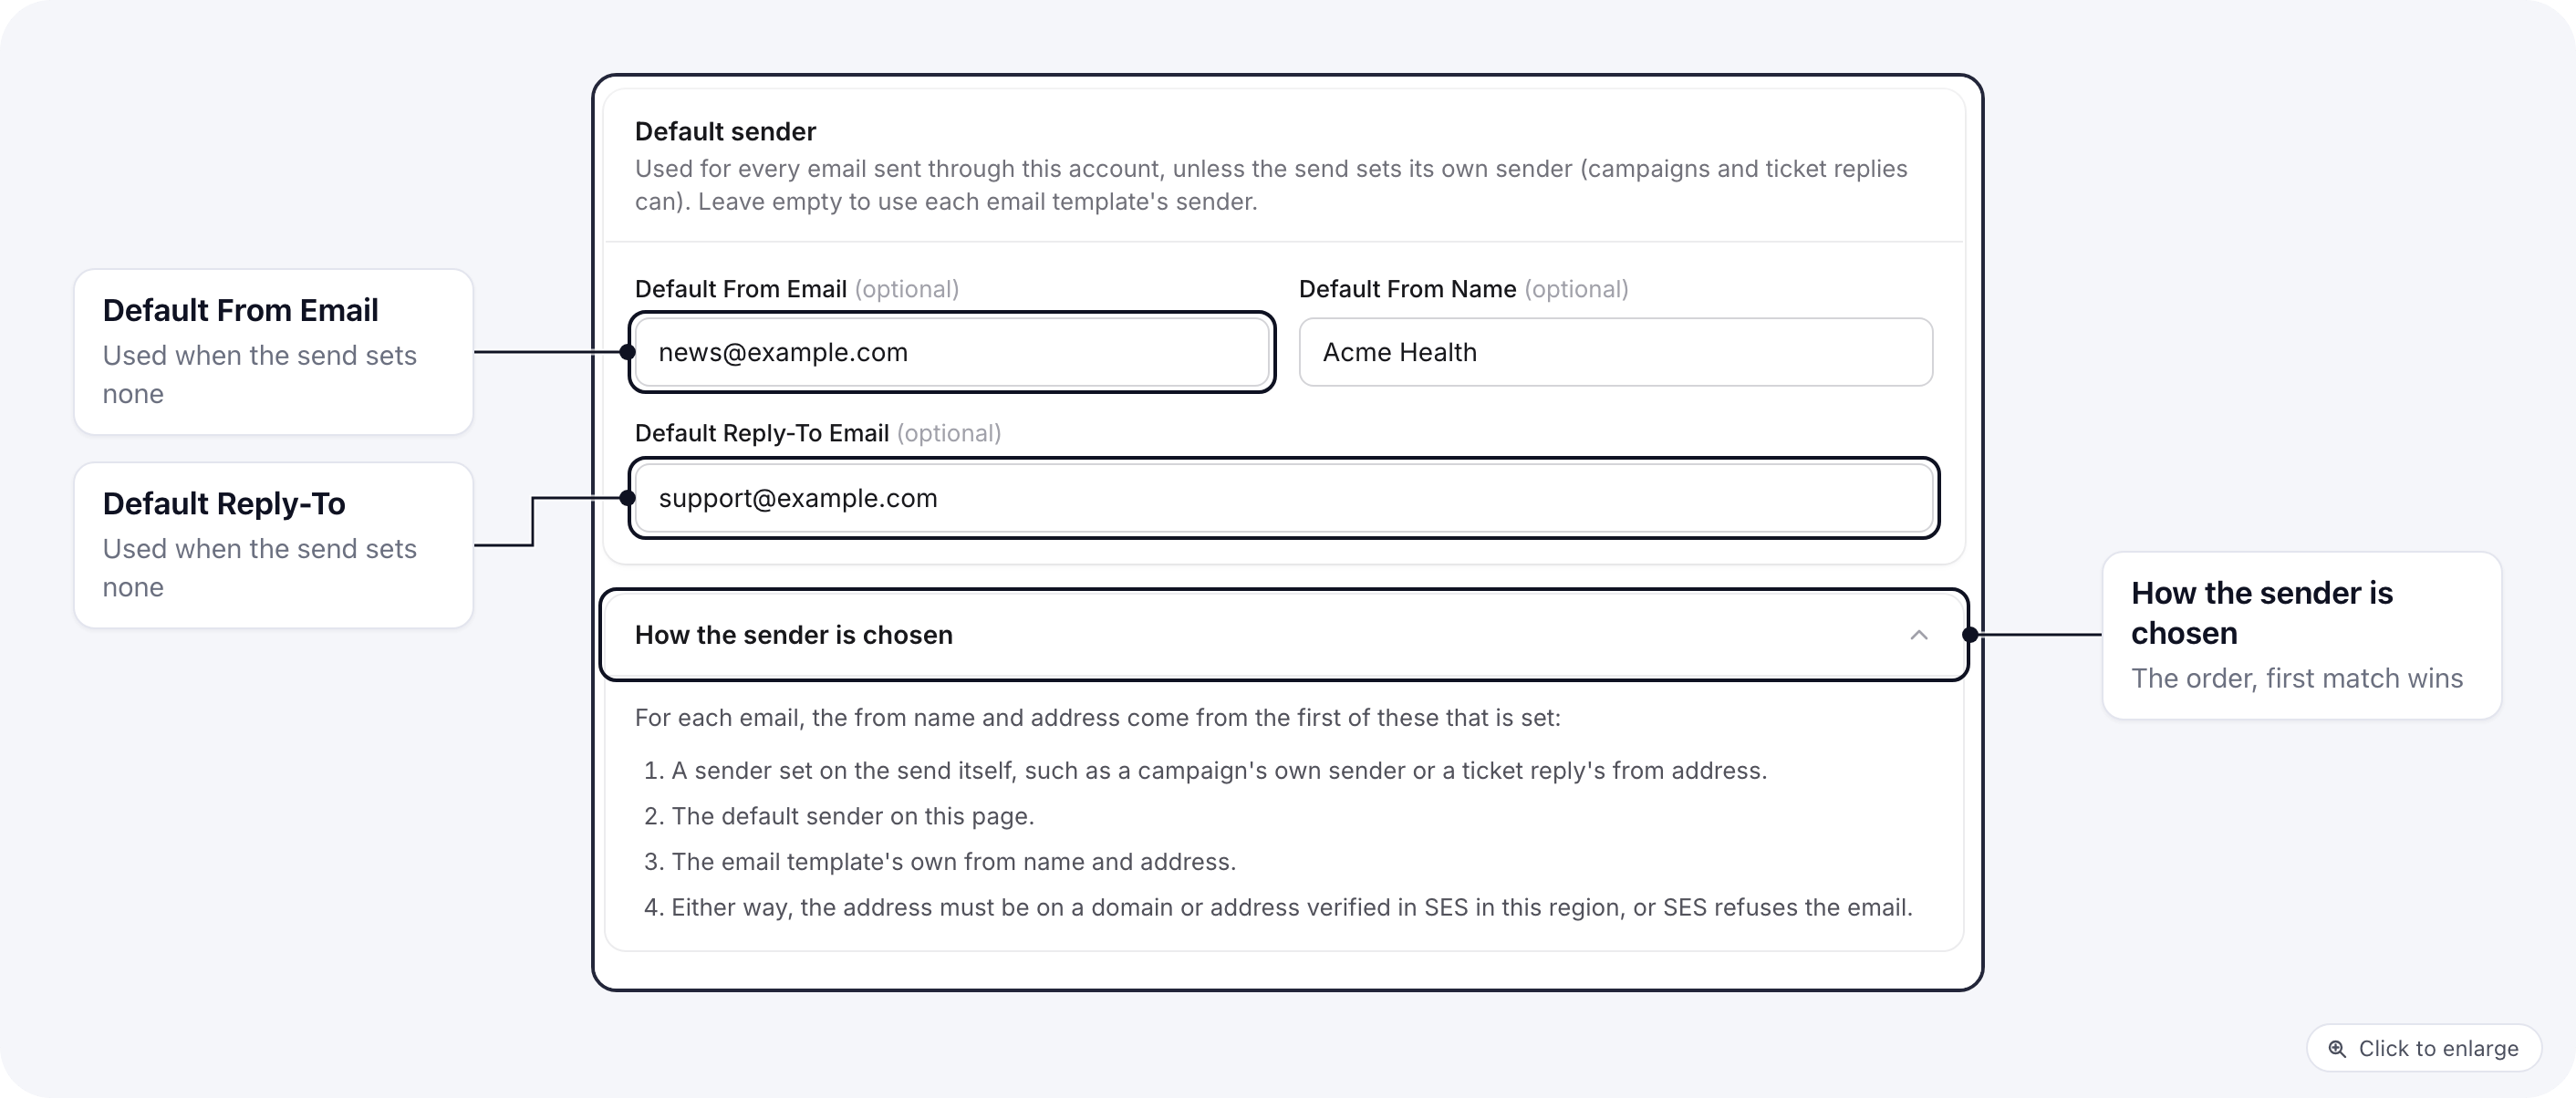 For each email sent through Amazon SES, Postmark, Brevo or Resend, the from address comes from the
first of these that is set:
1. **A sender set on the send itself.** A campaign's own from address, a ticket reply's
**Reply with Email**, or the **From email** typed on an automation's Send email step.
2. **The account's Default From Email.**
3. **The email template's** from address.
If none of the three is set, the email is not sent and the error asks you to set a default from
email on the account or on the email.
The from name follows the address. When the send sets its own sender, its name is used. Otherwise
the account's **Default From Name** is used, and the template's name only when the account has
none.
Reply-to works the other way round. The reply-to on the email itself (the campaign's, or the
template's for an order email) is used first, and the account's **Default Reply-To Email** only
when the email has none.
When the brand sends over SMTP instead, the sender on the SMTP settings is used for every email.
See [Sending Setup](/emails/sending-setup#the-from-address-on-the-template-is-ignored).
## Related docs
* [Delivery events](/emails/delivery-events): opens, clicks, bounces and complaints from these accounts
* [Send email step](/automations/send-email): send from an automation through any account
* [Sending Setup](/emails/sending-setup): brand SMTP, merchant integrations and templates
* [Emails Not Sending](/emails/troubleshooting): what to check when a customer got nothing
This documentation is built and hosted on [Mintlify](https://mintlify.com), a developer documentation platform.
For each email sent through Amazon SES, Postmark, Brevo or Resend, the from address comes from the
first of these that is set:
1. **A sender set on the send itself.** A campaign's own from address, a ticket reply's
**Reply with Email**, or the **From email** typed on an automation's Send email step.
2. **The account's Default From Email.**
3. **The email template's** from address.
If none of the three is set, the email is not sent and the error asks you to set a default from
email on the account or on the email.
The from name follows the address. When the send sets its own sender, its name is used. Otherwise
the account's **Default From Name** is used, and the template's name only when the account has
none.
Reply-to works the other way round. The reply-to on the email itself (the campaign's, or the
template's for an order email) is used first, and the account's **Default Reply-To Email** only
when the email has none.
When the brand sends over SMTP instead, the sender on the SMTP settings is used for every email.
See [Sending Setup](/emails/sending-setup#the-from-address-on-the-template-is-ignored).
## Related docs
* [Delivery events](/emails/delivery-events): opens, clicks, bounces and complaints from these accounts
* [Send email step](/automations/send-email): send from an automation through any account
* [Sending Setup](/emails/sending-setup): brand SMTP, merchant integrations and templates
* [Emails Not Sending](/emails/troubleshooting): what to check when a customer got nothing
This documentation is built and hosted on [Mintlify](https://mintlify.com), a developer documentation platform.