
ef commands, and you approve the send. Each step below shows the prompt and
the commands it runs, so you can also type them yourself.
Watch the walk-through: Build your own CRM with Claude Code.
Before you start
- The ef CLI 0.28.4 or later, connected to your project. Install it with
npm i -g @elasticfunnels/cli@latestand check the version withef --version. Then runef initin an empty folder and approve the connection in your browser. The full walk-through is Connect the ef CLI. - Claude Code, opened in that folder.
ef initalso runsef claude, which installs theef-crm,ef-campaignsandef-segqlskills into.claude/skills/. They tell Claude Code how to build a CRM and import into it, how to build audiences, and how to send safely. Runef claudeagain if you set the folder up with--no-claude. - A sending account for campaigns (Amazon SES, Postmark, Brevo, Resend, Mailgun, SendGrid, Mailrelay or your own SMTP). See Before your first campaign.
- Permissions: the CRM permissions to create entities and fields, and the email permissions to create and send campaigns. The CLI acts with the permissions of the person who approved it.
1. Create a CRM entity and its fields
An entity is a type of record in the CRM, such as Leads, and its fields are the columns each record has. An entity in CRM mode also has pipelines, the stages a record moves through. The full model is in the CRM overview. Ask Claude Code:entities create prints the new entity’s number: ✓ Created CRM entity #120 (leads). Keep it, because the campaign
in step 3 uses that number. ef crm entities list shows it again later. pipelines create prints the pipeline’s
number, which the stages create lines use.
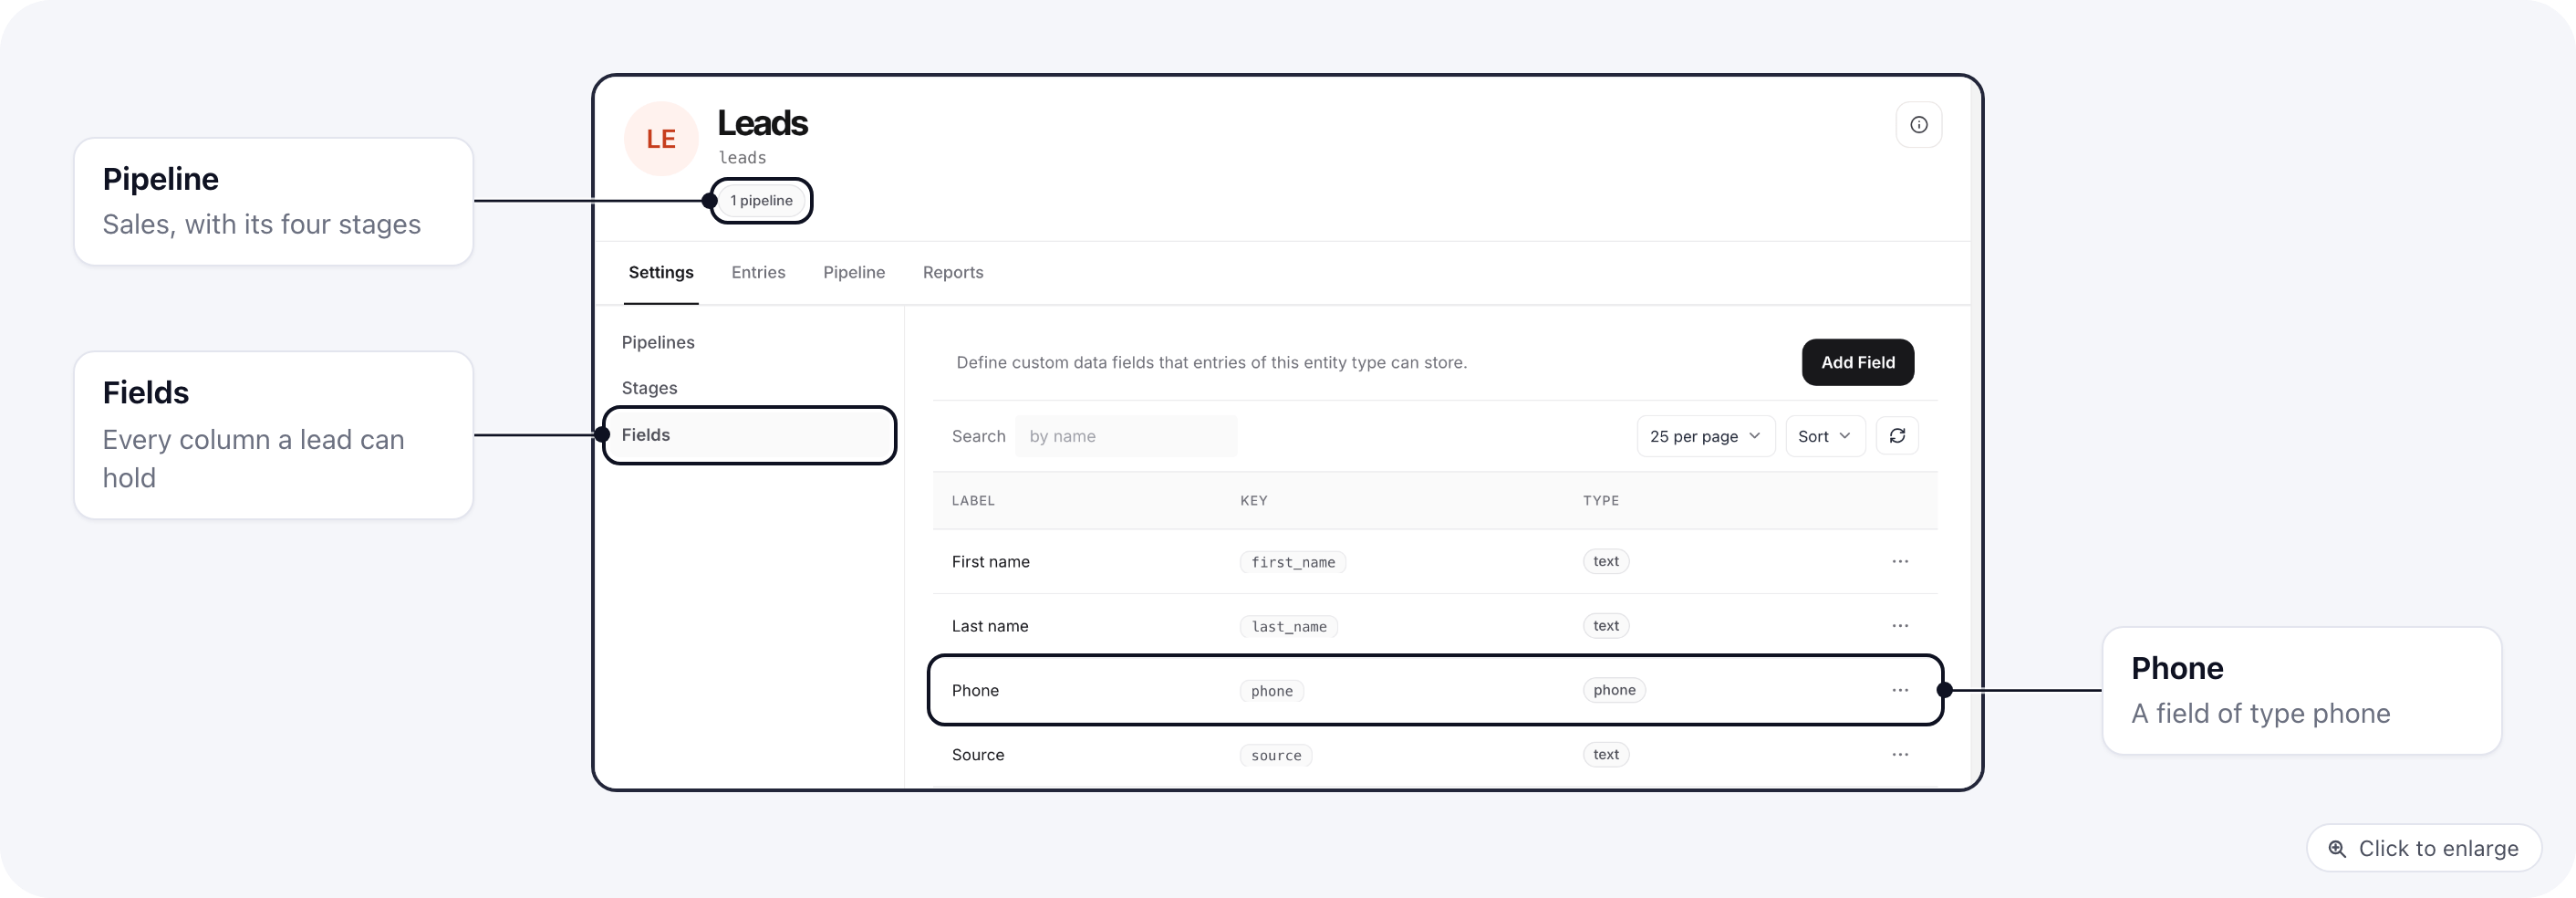
email. When a campaign goes to this entity, ElasticFunnels reads each address from the entity’s email-type fields
(or from a field with the key email when there is none), and skips a record with no valid address.
Keep a First name field (key first_name) if your emails greet people by name. The merge tag
{{ customer.first_name }} takes its value from that field. Without one, it falls back to a field keyed name or
full_name and inserts the whole name, so the greeting reads “Hi Ann Lee”. A full name is not split into first and
last, so give your file a first name column of its own.
The other field types are listed in ef crm fields create --help and in
Supported field types.
2. Upload contacts from a CSV or Excel file
Put your list in a.csv, .tsv, .txt or .xlsx file with the column names in the first row. An Excel file
is read from its first sheet only; save old .xls files and Numbers files as .xlsx or .csv first. One file
can hold up to 20 MB and 20,000 rows, so split a bigger list.
Ask Claude Code:
ef-crm skill, installed by ef claude with the others, has Claude Code run the import in two passes: a
preview first, which it shows you, and the real import only after you agree.
Preview the plan
Read the type of every
create line and change what you disagree with before you import. Under the table,
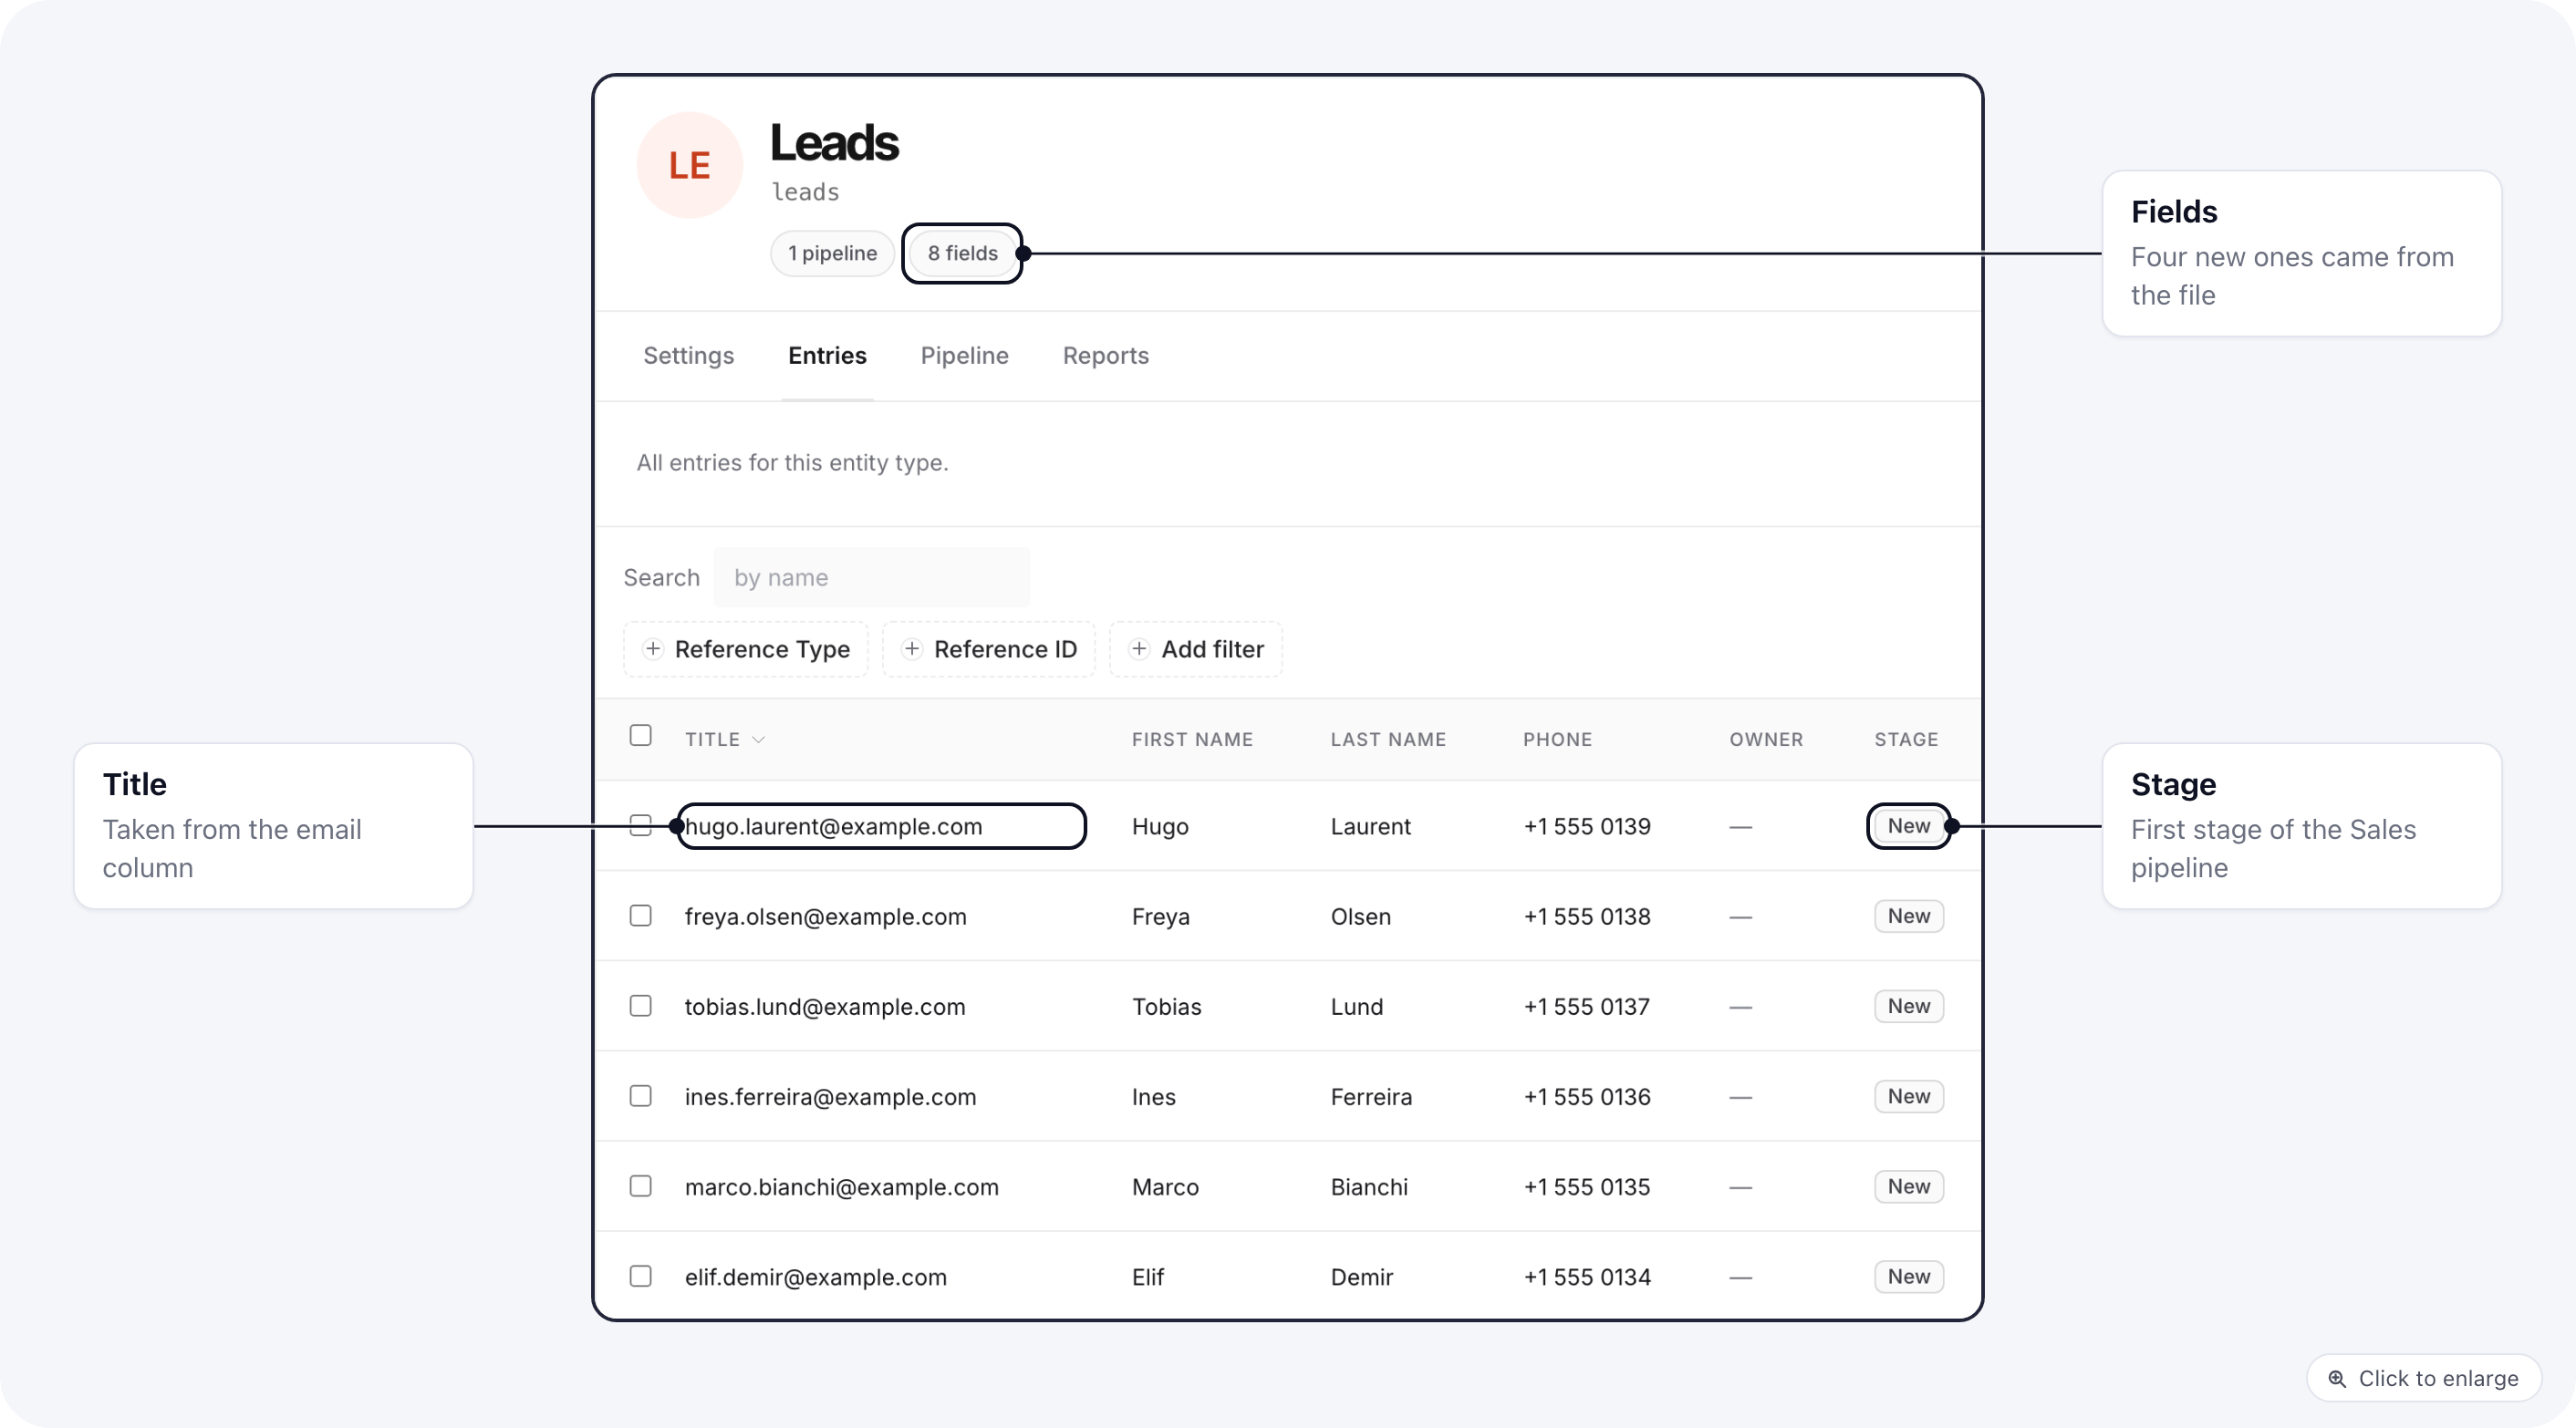
Title from names the column used as each record’s title, then the pipeline and stage the records go to, and
New fields lists the fields the import would create.
Check the email column before you go on, because the campaign in step 3 reads the address from the entity’s
email field. It has to show existing on an email field, or create with the type email. When the header is
something else, or a type is wrong, map it yourself:
--map "Column=key[:type]"sends a column (its header, or its position counting from 0) to a field key. A key the entity does not have yet is created with the suggested type, or with the type after the colon: text, textarea, email, phone, url, number, date, datetime, boolean, select or multiselect. Repeat it for more columns.- A tag column becomes a
multiselectfield when its values look like lists. If it is not detected as one,--map "Tags=tags:multiselect"forces it. --skip <column>leaves a column out. Repeatable.--title <column>picks the column used as each record’s title.--pipeline <id>and--stage <id>pick where the records go in an entity in CRM mode. Without them, records go to the first stage of the default pipeline: New in the Sales pipeline here.
Import
--map, --skip and --title flags you used in the preview. The import first creates the new
fields (Created field email (email). for each), then sends the rows in batches of up to 250 (--batch sets a
smaller size) and prints a line per batch. It ends with a summary:
--json prints the whole result,
every error included.
Without --yes, the command asks for confirmation in a terminal. Where there is no terminal to ask in, as when
Claude Code runs it, it stops instead, so Claude Code adds --yes once you have approved the plan.
Imported records do not trigger stage automations or form webhooks. They show up in Apps → CRM under the
entity, like records added by hand.
3. Send an email campaign to the list
Write the email
Ask Claude Code for the email itself as an HTML file, and say who it is from:--html-file in the next step.
{{ customer.first_name }} is filled from each lead’s First name field when the email is sent.
ElasticFunnels adds the footer with the unsubscribe link and your postal address to every campaign email when it
is sent, so the HTML only needs the message. See The footer and unsubscribe link.
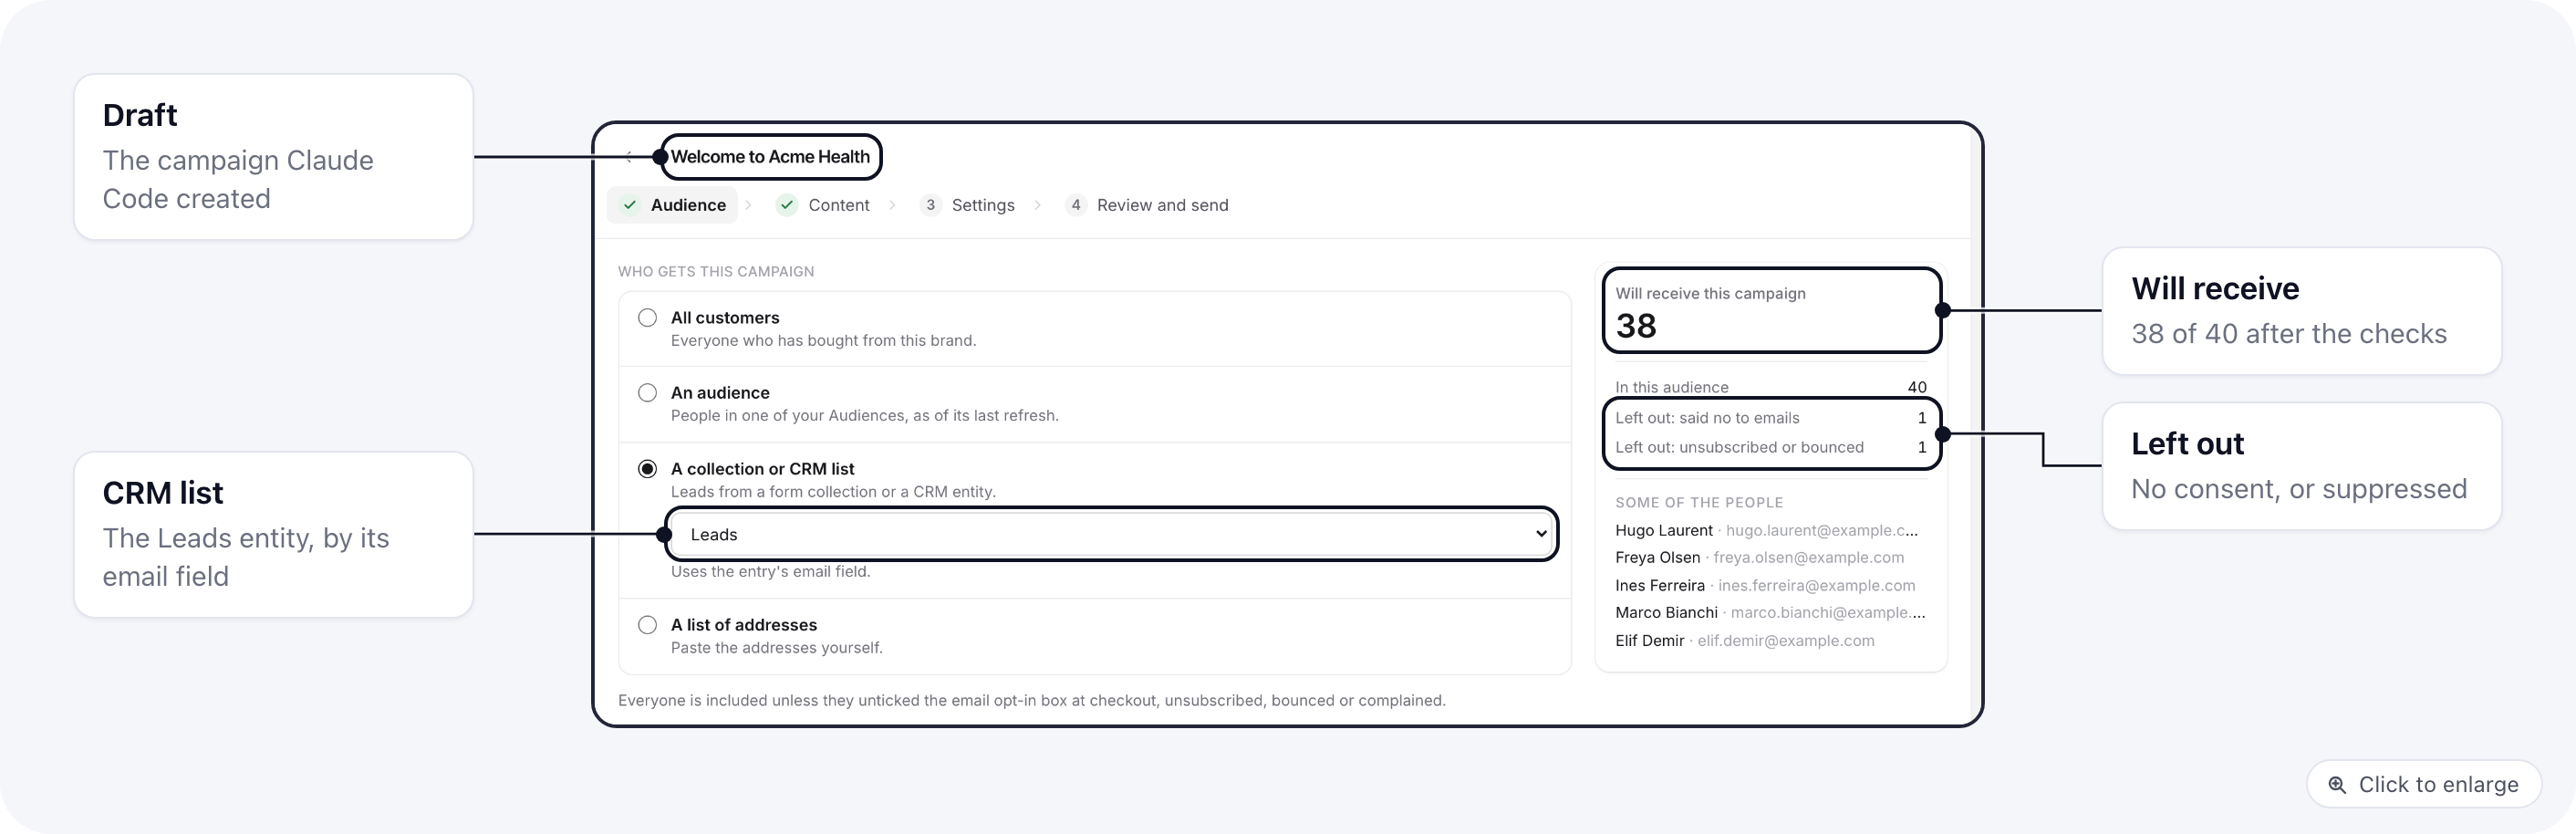
Create the campaign for the CRM list
--crm-entity takes the entity number from step 1. The command prints ✓ Created draft email campaign #35. and
then lists anything that would still block sending, such as a missing subject or sending account
(--integration <id> picks the sending account). ef campaigns email get 35 shows the same list later. To change
the email of a draft, run ef campaigns email set 35 --html-file welcome.html.
Send to a saved audience instead
Send to a saved audience instead
A campaign can also go to a saved audience: people picked by what they did, written as a SegQL query. Ask Claude
Code something like “email everyone who bought twice in the last year”, and it writes and checks the query with
the
ef-segql skill:--audience takes the number audiences create printed. More on audiences:
Audiences and campaigns from the ef CLI.Count who will receive it
count is short for audience-preview. It prints one line, then a few sample addresses:
Send a test to yourself
✓ Test sent to alex@example.com via mailgun., naming the service it went through. Without --to, the test goes
to the address of the account that connected the CLI. The test is the real email, footer included, and it never
goes to the list. You can send 10 tests per campaign per hour.
Schedule or launch
--yes, and the ef-campaigns skill tells Claude
Code to show you the count, the subject and the time and to add --yes only after you say go.
The send is also refused while no test was sent. --skip-test overrides that and sends without a test; leave it
out unless you have already checked the email another way. A schedule has to be more than a minute ahead, and
ef campaigns email unschedule 35 turns a scheduled campaign back into a draft. cancel stops one that is
scheduled or already sending, but emails already sent stay sent.
Read the results
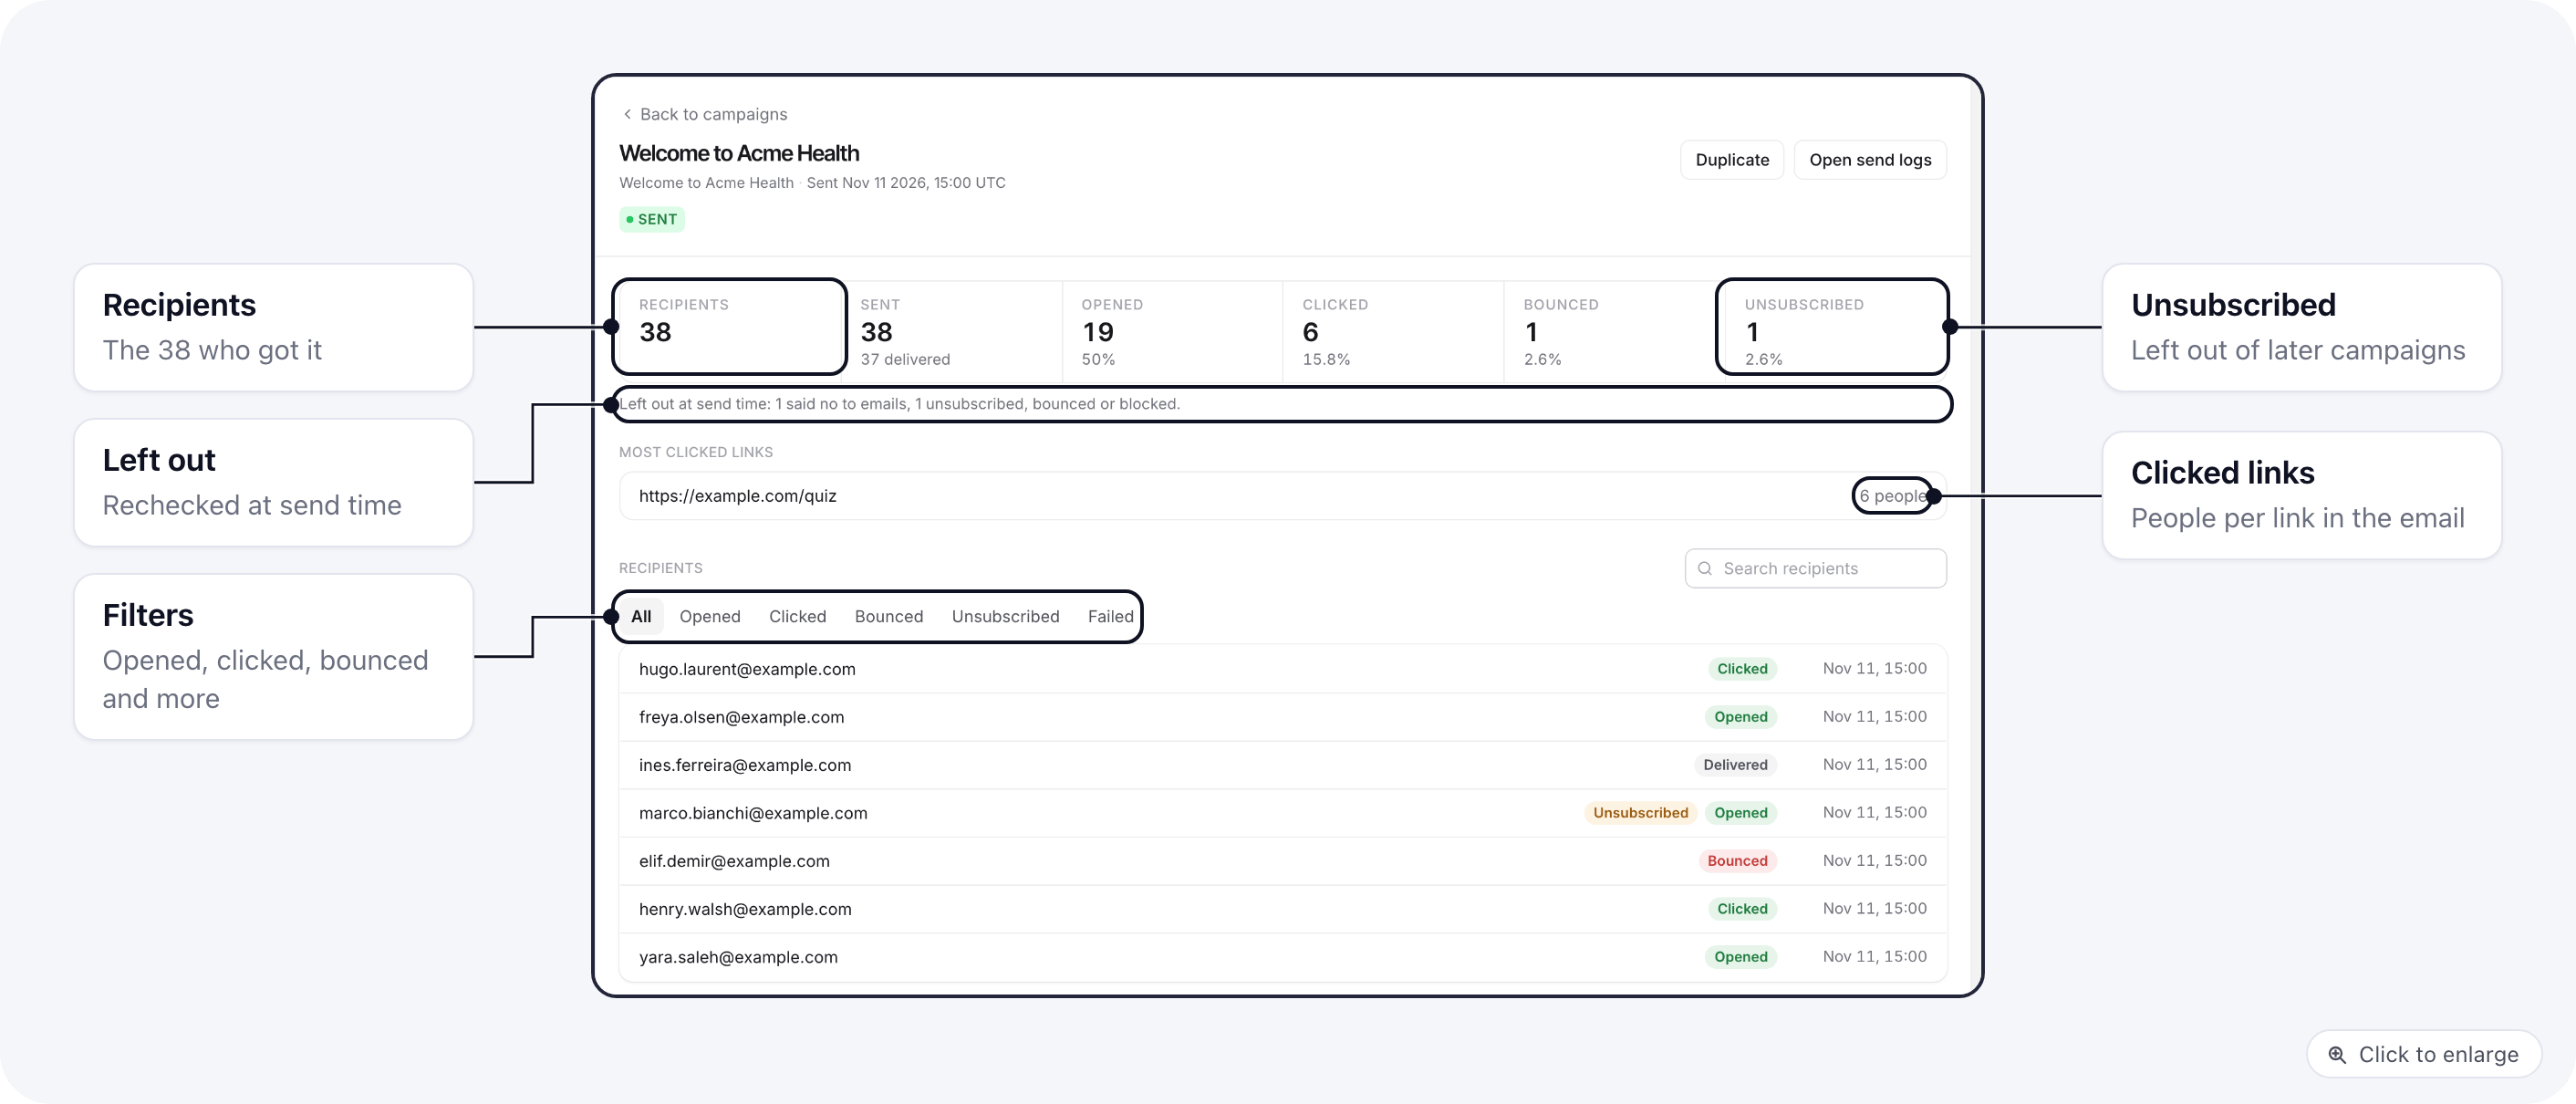
stats shows recipients, sent, delivered, failed, bounced, opened, clicked, unsubscribed and complaints.
recipients lists each address and what happened to it. Opens and clicks are counted only when your sending
account reports them back; see
Delivery stats. The same report is in
the app under Campaigns: The report.
Related
- CRM overview: entities, fields, pipelines and entries in depth.
- Contacts: one record per person in your brand, matched from orders, abandoned checkouts and form fills. Importing Contacts adds a CSV to that Contacts list with each person’s consent; it does not fill a CRM entity.
- Email campaigns: the same campaign in the app, step by step.
- Audiences and campaigns from the ef CLI: every audience and campaign command, SMS included.