
Own price or Sells another product
Every variant row has a Sells as choice.
Leave Price blank on an own-price variant to use the product’s price. Fill it only when that version costs more or less.
Selling through Explodely? An own-price variant can have its own Explodely product ID (an Explodely ID column in the variant rows), so each pack sells as its own Explodely product. Left empty, it uses the product’s. See Explodely, variants.
Set up Color and Size
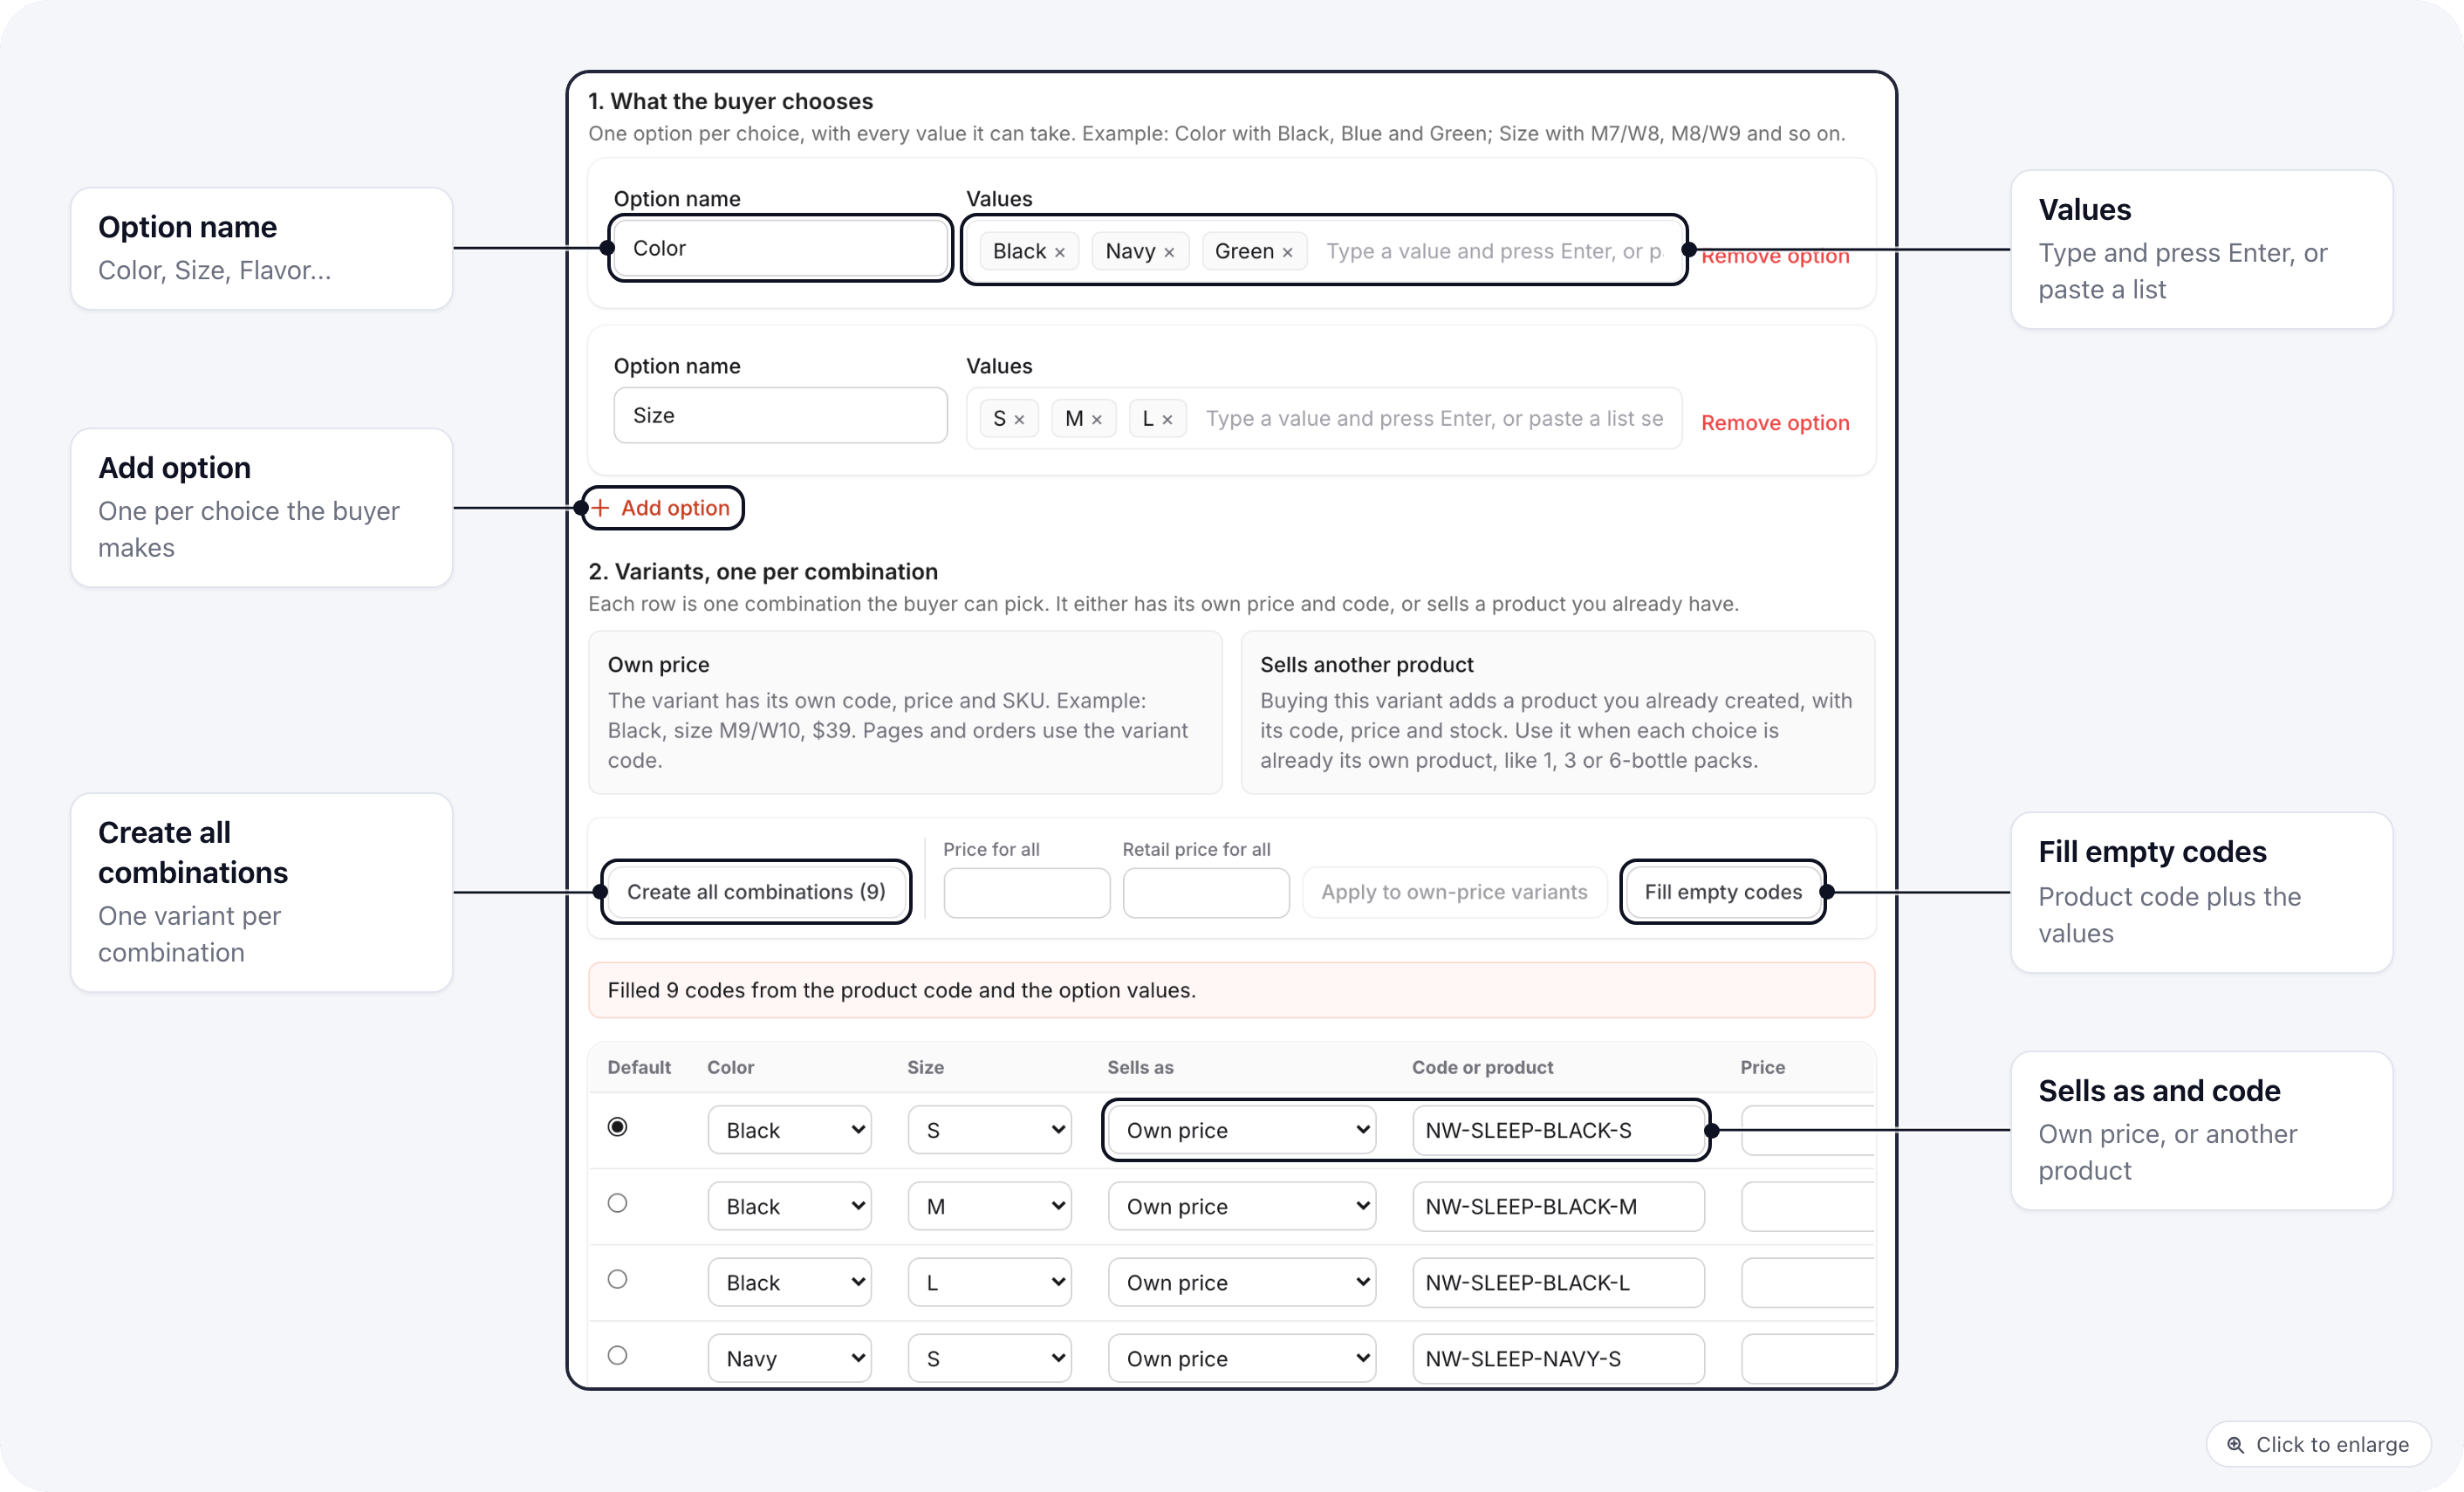
- Open Settings → Products, open the product and go to the Variants tab.
- Under 1. What the buyer chooses, click Add option. Type the Option name (
Color) and its Values: type one and press Enter, or paste a list separated by commas (Black, Navy, Green, Gray, Red). - Click Add option again for
Sizeand paste every size. - Under 2. Variants, one per combination, click Create all combinations. The button shows how many it will make (5 colors x 11 sizes = 55) and skips combinations that already exist.
- Optional: type a Price for all and click Apply to own-price variants. Leave it empty to keep the product’s price.
- Click Fill empty codes. Codes are built from the product code and the values, for example
KNS-3-GREEN-M12W13. You can edit any of them. - Pick the Default variant (selected when the buyer has not chosen yet) and click Save.
Worked example: massage insoles
Kneadstep sells massage insoles in 5 colors and 11 shoe sizes, as 1, 2, 3 or 5-pair packs. The packs stay four products, so pack prices, free gifts and upsells keep working per pack. Each pack has one own-price variant per color and size, with the price left blank so it uses the pack price. Products (one per pack)
Options (the same on each pack)
Variants (55 per pack, made with Create all combinations)
That is 4 products and 220 variants, made in four clicks of Create all combinations. A buyer who picks Green, M12/W13 and the 3-pair pack buys
KNS-3-GREEN-M12W13: the order line is KNS-3 with Color: Green, Size: M12/W13, and stock is taken from that variant.
One order line is one variant. A 3-pair pack with three different sizes is not supported yet: sell it as three lines, or ask the buyer to order one pack per size.
What a page gets
getProduct(code) and getProducts(...) return the product with:
product_fields: the options in order, each{ name, options }(optionsis the list of values).variants: one entry per variant, sorted by position, exactly one withis_default: true.
getProduct('KNS-3-GREEN-M12W13') (a variant’s own code) returns the pack with that variant on top: code is the variant code, price, image and sku are the variant’s, parent_code is KNS-3, and variant holds { id, code, title, label, option_values }.
Product page: color, size and pack picker
A complete page for the insole example. It reads every price and name from the four pack products, lets the buyer pick a color, a size and a pack, then adds that exact variant to the cart or opens the checkout. Without JavaScript it shows one plain list of every pack, color and size that goes straight to checkout. The backend script at the top starts the page on the variant in the URL (?v=KNS-3-GREEN-M12W13 or ?p=), using resolveVariant(product, code) when the code belongs to the main product, and the default variant otherwise.
@set(packs = getProducts({ codes: '...', show_in_frontend: 'any' }))loads the four packs in one call.show_in_frontend: 'any'also returns packs you hid from shop listings.- The
<script>puts a compact list of every variant onwindow.efScope.vp; the helpers (current,code,buyUrl,priceText,add) live on that object, so bindings stay free of;. - Option buttons pass their name and value through
data-*attributes and$el.dataset. Values are printed into attributes, never[[ ]]inside an attribute. - Add to cart calls
window.ef.addToCart(code, { price, name, currency })with the variant’s record values; the cart re-prices every line from the catalog anyway. - Buy now is a buy link to
/b?p=<variant code>.
Other ways to send the choice
Checkout: pack selector that keeps the color and size
The product page sends the buyer to/b?p=KNS-3-GREEN-M12W13. On the checkout, a package selector lets them switch between 1, 2, 3 and 5 pairs. Each row must sell the same color and size in another pack, so the rows are built from the variant in ?p=:
- Each row’s
data-ef-packageis a variant code, so a switch keeps Green M12/W13 and changes only the pack. The selector marks the row matching?p=on first paint. - A
?p=that is a pack code (KNS-3) starts on that pack’s default variant; an unknown code renders no rows, so link to the checkout only with real codes. - Keep the buy link in each row’s
href: without JavaScript it still opens the checkout for that row. - If your checkout names its product in a backend script (
checkout_product), list the row codes incheckout_packagestoo, see Package selector.
After the purchase: thank-you page, members area, order views
Each order line stores the product (product_sku is the pack code, e.g. KNS-3) and the variant: variant_id, variant_code, variant_sku, variant_title (Green / M12/W13), variant_label (Color: Green, Size: M12/W13) and variant_options ([{ name, value }]).
A thank-you or order summary prints the label under the product name:
line.variant_label is available on the lines of getOrder(...) and getOrders() in the members area. In the app, the order drawer shows Kneadstep Massage Insoles, 3 pairs (Color: Green, Size: M12/W13), the conversions export adds the label after the product name, and two variants of one product stay two lines.
Right after checkout the thank-you page reads the order from the session; the variant label appears once the order line is indexed, usually within a minute. Fulfilment exports to ShipOffers, Jetpack and Shopify order sync still send the pack’s SKU, not the variant’s.
Variant attributes
Product Attributes with Applies To set toVariant or Both get one input per variant row, managed in the app and through the API (products/{product}/variants/{variant}/attribute-values). Page templates cannot read per-variant attribute values yet: the attr filter reads the product’s attributes only. See Product Attributes.
Troubleshooting
The cart drops the code, or the buy link answers 404. The code is not a product code and not an own-price variant code. Check the spelling in the Variants tab (codes are matched without case), check the variant is Own price (a Sells another product variant sells the other product’s code). A variant of a deleted product is never found. The price is wrong. A variant’s own Price wins over everything; clear it to use the pack price. A Sells another product variant uses the other product’s price unless you fill Price on the row. The checkout always charges the catalog price for the code, whatever the page shows, so fix the record, not the page. The page starts on the wrong variant. The Default radio picks the variant used when nothing is chosen; exactly one variant is the default (if none is picked, the first row is). A?v= or ?p= code in the URL wins when your page reads it, as in the picker example.
Saving says a code is already used. Each own-price variant code must be unique in the project, including product codes. Use Fill empty codes on rows with an empty code, or edit the code.
Create all combinations is greyed out. Every option needs at least one value. Options without fixed values (older text options) are not combined.