
Where to find it
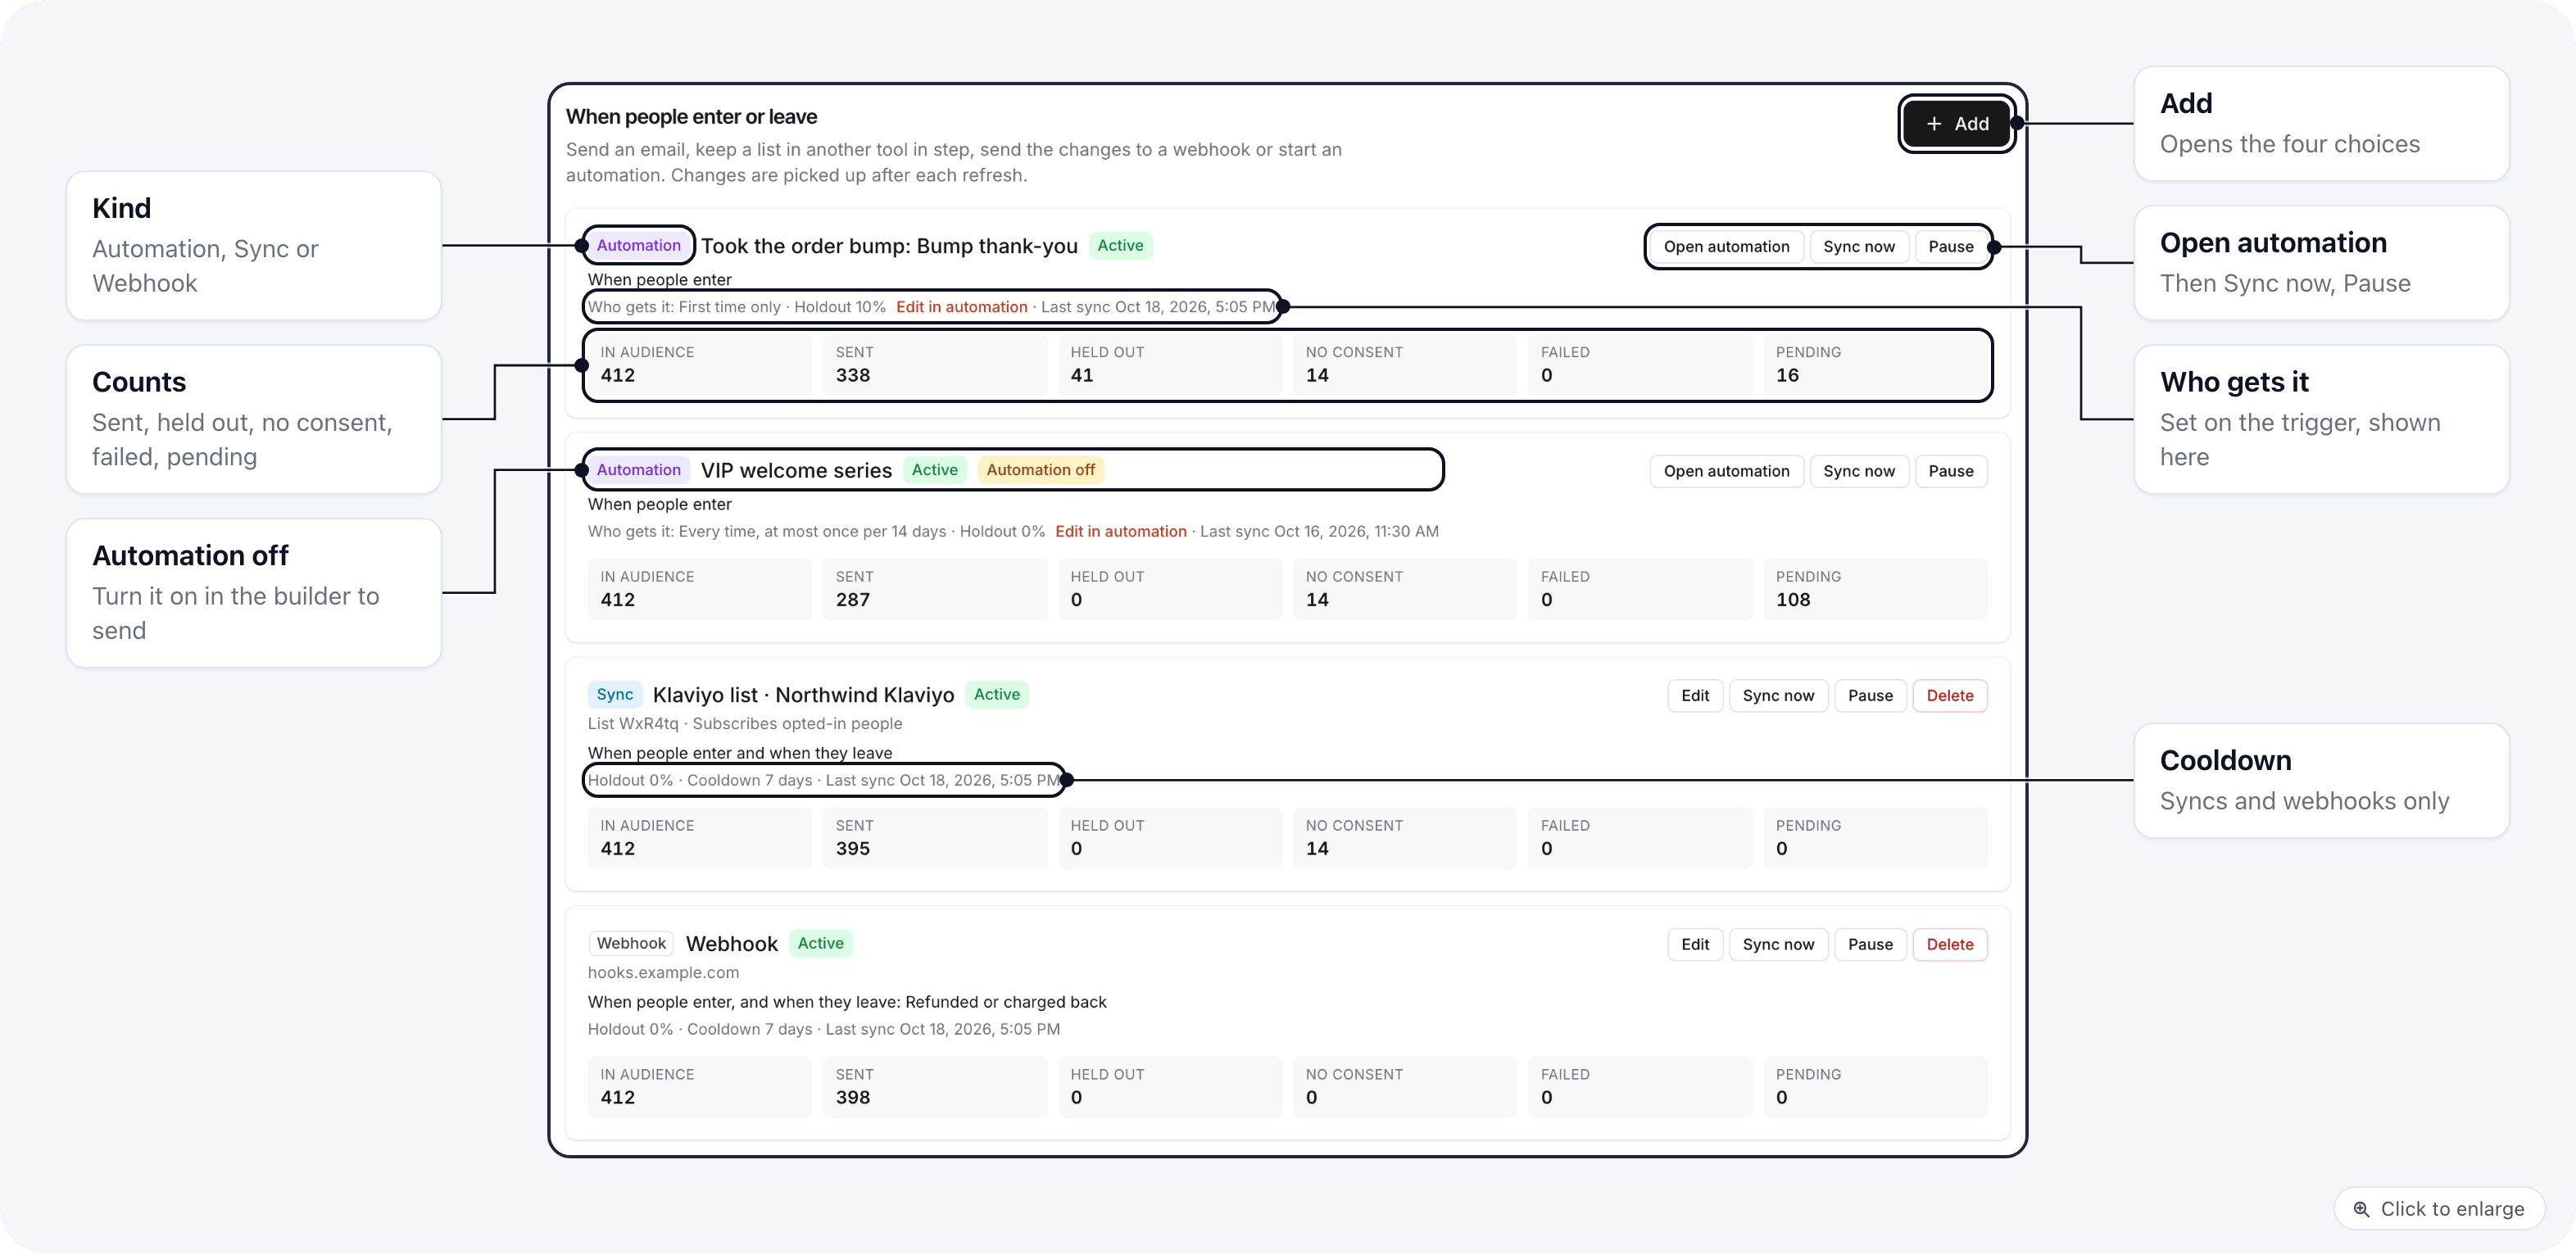
Open Reports → Audiences, pick an audience, and scroll to When people enter or leave on its Overview tab. Each row starts with its kind (Automation, Sync or Webhook) and shows where it sends, when it runs, its holdout and cooldown, the last sync, and its counts:
Each row has Edit, Sync now and Pause / Resume. Sync and webhook rows also have Delete, which
leaves people already sent where they are. Automation rows have Open automation instead, and show
Automation off while the automation is not turned on: nobody is run through it until you turn it on in the
builder. An audience can have up to 20 actions.
Add an action
Click Add. The window asks What should happen when people enter or leave this audience? Pick one of four choices and click Continue: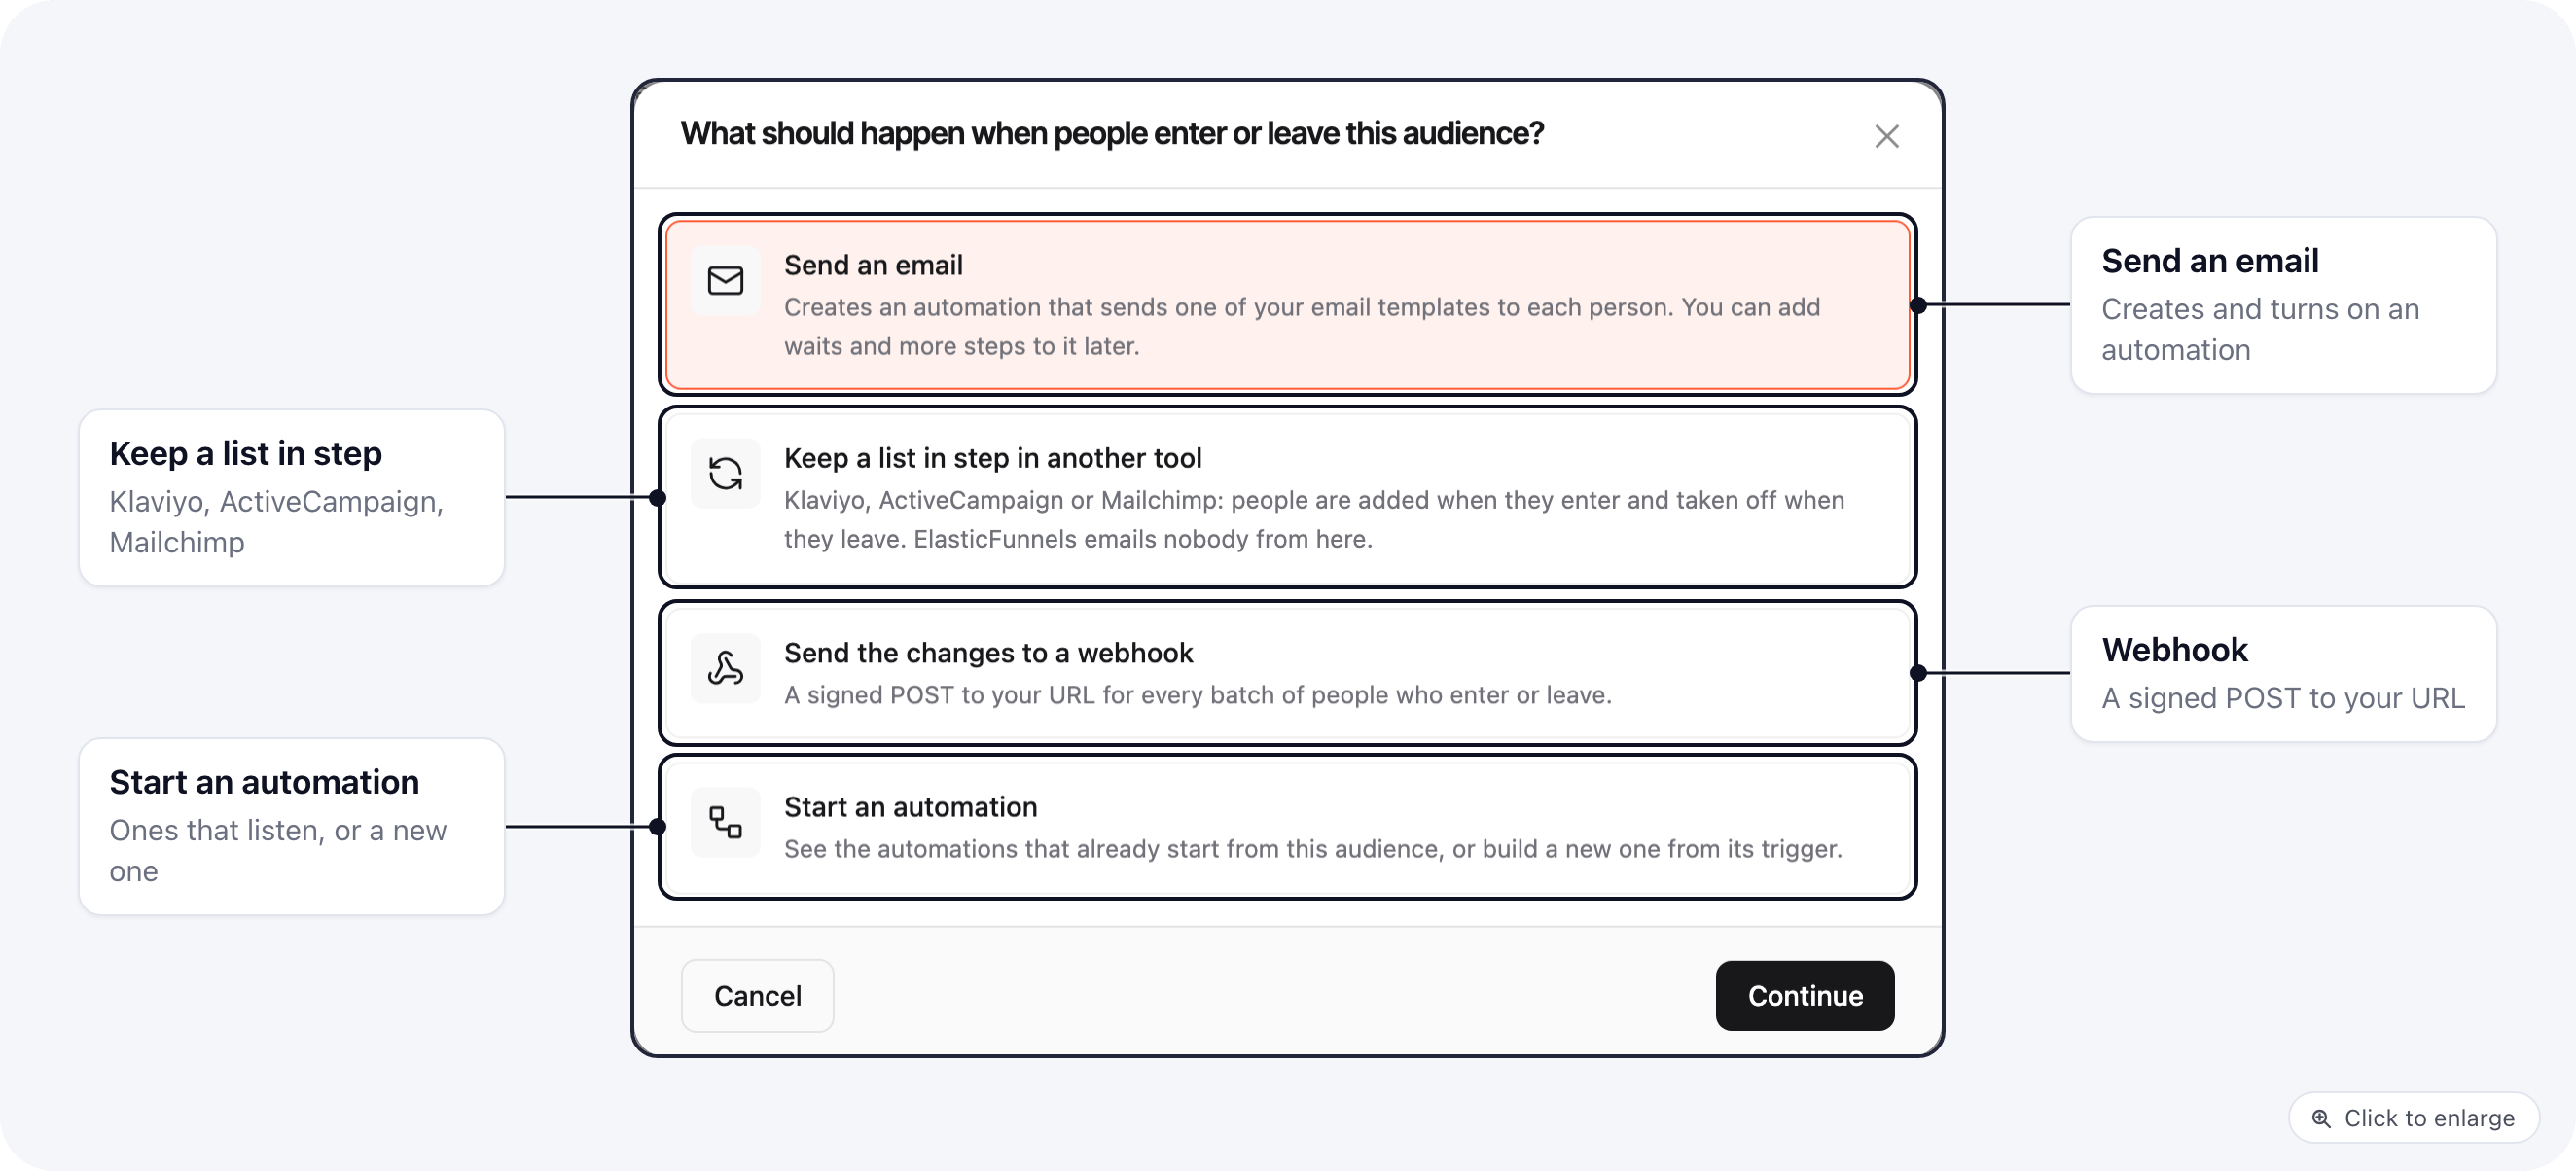
Send an email and Start an automation need a role that can create automations, and count toward your
plan’s automation limit.
Send an email
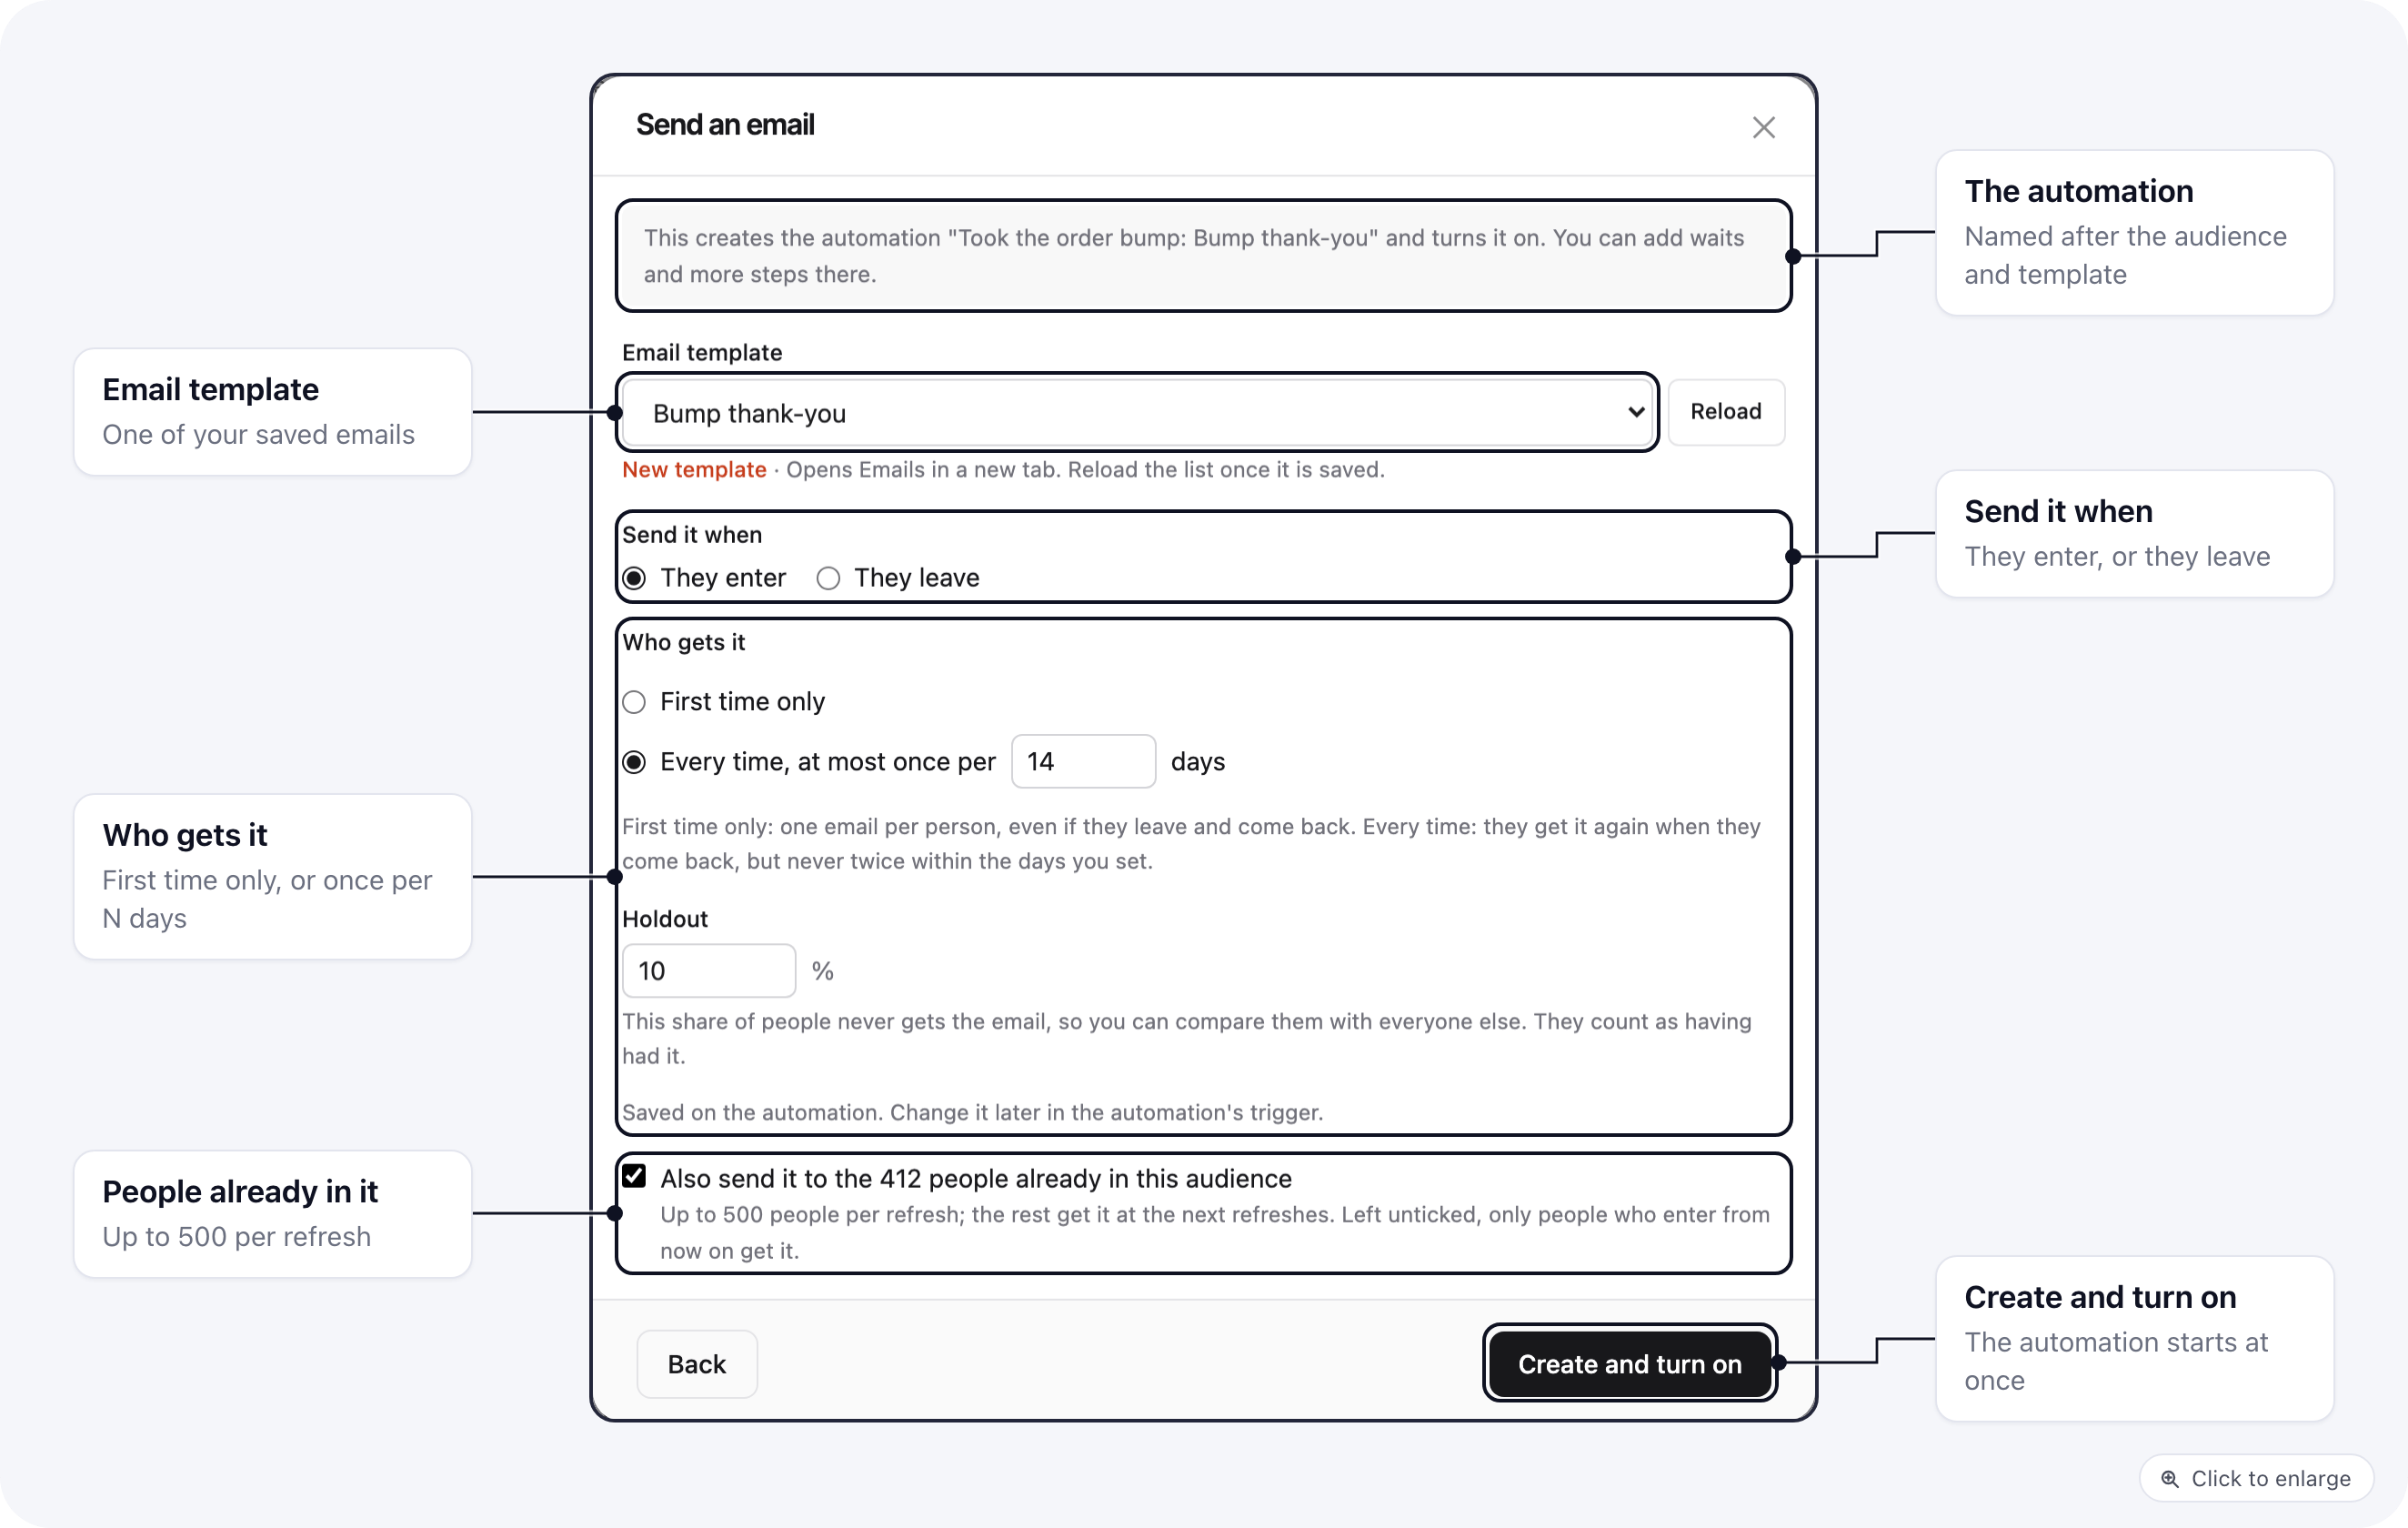
- Pick an Email template. The list holds your saved emails, the same ones the automation Send email step offers. New template opens Emails in a new tab; click Reload once it is saved.
- Under Send it when, pick They enter or They leave. For They leave, you can limit it to some reasons under Only when they left because.
- Set the Holdout and Cooldown (see The settings).
- To send it to people who are already in the audience too, tick Also send it to the N people already in this audience (only for They enter). Up to 500 of them are sent per refresh, and the rest at the next refreshes. Left unticked, only people who enter from now on get it.
- Click Create and turn on.
Took the order bump: Bump thank-you, made of the trigger (On Entered Audience or On Left Audience) and a
Send email step. It is turned on at once and shows up in the list as an Automation
row. Click Open automation to add waits, conditions or more emails in the builder.
The email goes out as a marketing email, with every safeguard of the Send email step: people who unsubscribed,
bounced, complained or said no to email are skipped, and each email carries an unsubscribe link and your postal
address. It is sent through your brand’s SMTP server, or through your only email sending account; to pick another
account, open the automation and set Sending account on the step. See
Send email: Marketing and Transactional.
Keep a list in step in another tool
The window says Sync to other tools. ElasticFunnels doesn’t email anyone from here. Pick the Account: the Klaviyo, ActiveCampaign and Mailchimp integrations installed on the brand. A tool you have not connected has a Connect button under the picker (Connect Mailchimp, for example), which connects it without leaving the page.
Subscribe people who opted in (Klaviyo and Mailchimp) subscribes everyone except people who left the email
opt-in unticked at checkout. Without it, people are added without a marketing subscription.
Send the changes to a webhook
Enter the Webhook URL and choose the Fields for each person. Each change is sent as its own event:audience.entered or audience.left. The signing secret is shown once, after you save. See
Webhooks for the headers, the body and how to check the signature.
Start an automation
This lists the automations that start from this audience: their trigger is Entered audience or Left audience, set to this audience. Open automation opens one in the builder. Under New automation from this audience, pick Starts when people enter or Starts when people leave and click Open the builder. It opens a new automation with the trigger already set to this audience. Add its steps and publish it; it runs once it is published. Publishing any automation whose trigger is set to this audience adds it to When people enter or leave right away. An automation runs for up to 500 people per refresh, once per person, and the rest follow at the next refresh.The settings
- When: They enter, They leave, or both (lists, tags and webhooks).
- Only when they left because: limit leave events to Bought, Refunded or charged back, Aged out or Audience edited. Leave all unticked for every reason.
- Holdout: a share of people (0 to 50%) that is never sent. Each person’s group stays the same, so you can compare the held-out people with the rest and see the real lift.
- Cooldown: someone who re-enters within this many days (0 to 30, default 7) is not sent again.
- Also sync the people already in this audience: off by default, so only people who enter from now on are sent.
Paused integrations
A paused integration still appears in the picker, marked (paused), and its rows show an Integration paused badge. You can save an action on it, but nothing is sent while it is paused: people wait as Pending and are sent once you resume the integration under Integrations.Edit an action
Click Edit on a row to change it after saving: the list or tag, the webhook URL and fields, when it sends, the leave reasons, holdout, cooldown and subscribe option. The kind itself (Klaviyo, a webhook, an automation) and an ActiveCampaign tag/list choice cannot be changed; to send somewhere else, add another action. To change the email or the steps of an automation, click Open automation.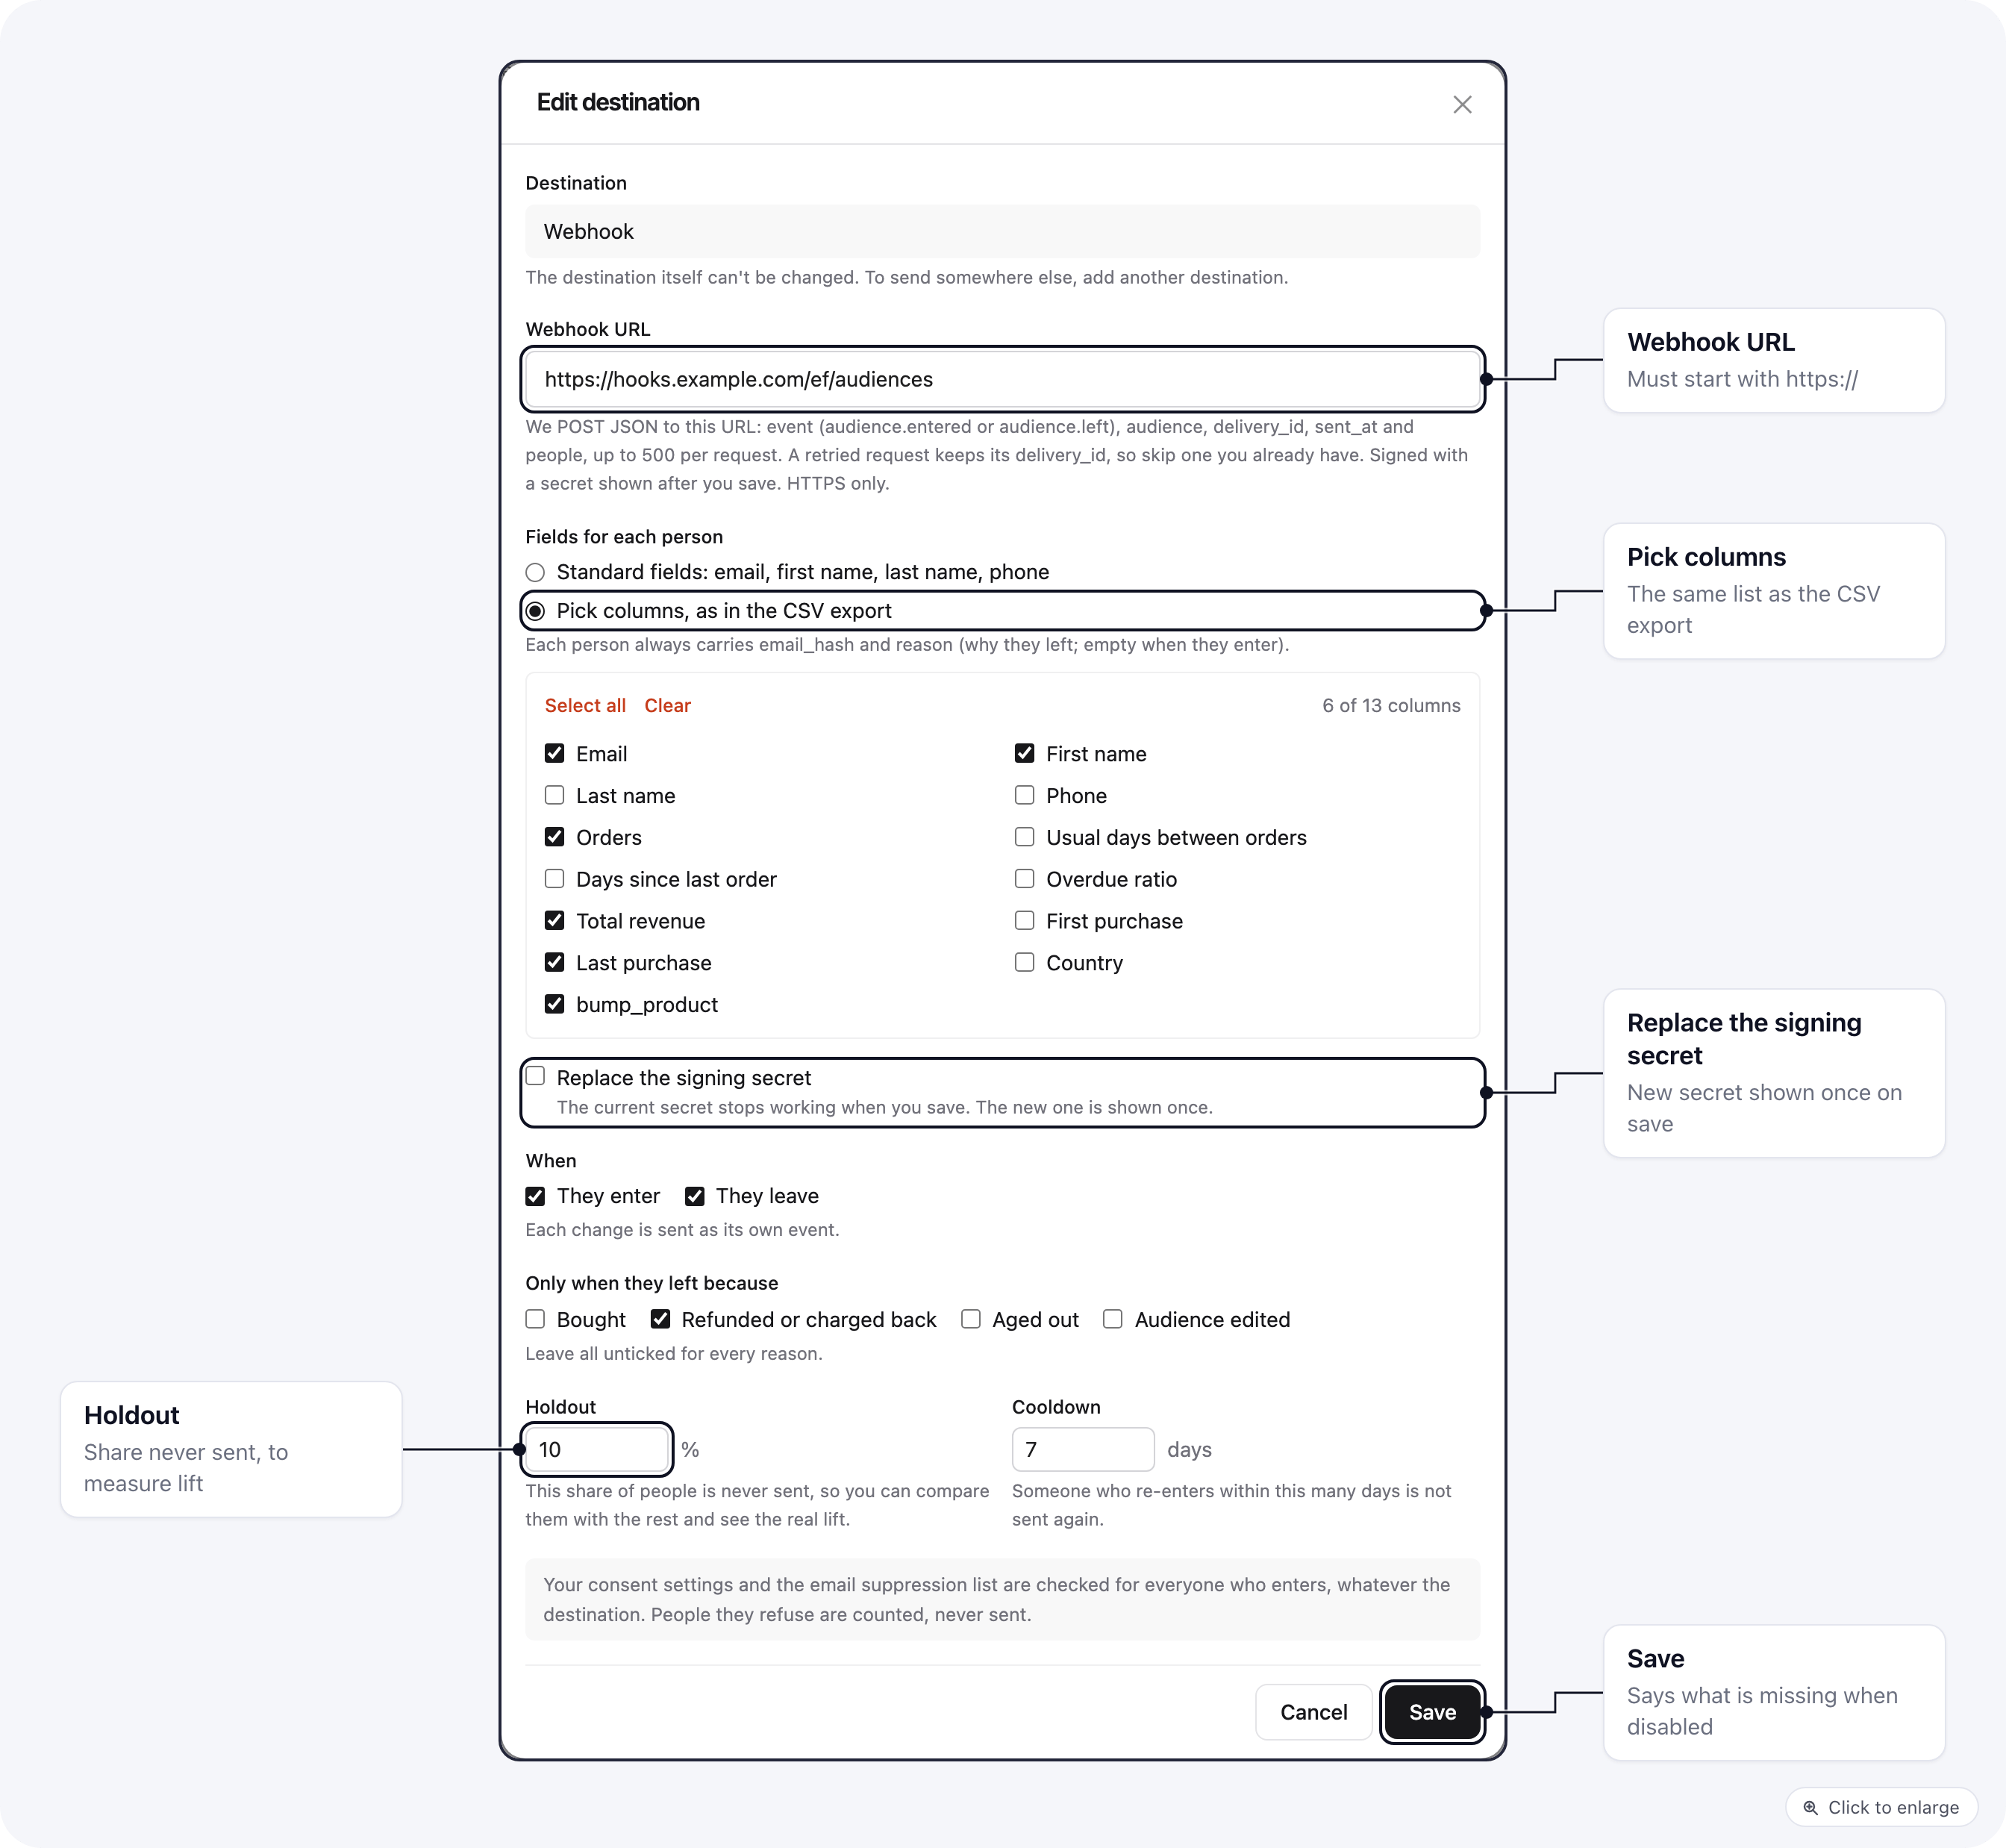
Who is never sent
Every person who enters goes through the same checks, whatever the action:- Consent: your brand’s consent settings. Email actions follow the same rule as email campaigns: everyone is sent except people who left the checkout opt-in box unticked. Refusals are counted under No consent.
- Email suppression list: people on the brand’s suppression list (unsubscribed, bounced or complained) are never added to a list, sent to a webhook, or run through an automation. They are counted, not sent.
- No email: a person with no known email address is skipped.
Webhooks
A webhook action POSTs JSON to your URL. The URL must use HTTPS and point to a public address.Signing secret
When you save a new webhook, its signing secret is shown once. Copy it then; it is not shown again. To change it, open Edit, tick Replace the signing secret and save. The old secret stops working at once, and the new one is shown once. Update your receiver right after.Headers
Verify the signature on the raw body before you parse it, and reject a timestamp more than 5 minutes old:
Body
Each request carries up to 500 people. Larger batches are split into several requests.Fields for each person
Under Fields for each person you choose the shape of each entry inpeople:
- Standard fields (the default):
email_hash,email,first_name,last_name,phoneandreason, as in the example above. - Pick columns, as in the CSV export:
email_hashandreason, plus exactly the columns you tick. The list is the same one the audience’s CSV export offers, including the audience’s own computed columns (for example which order bump each buyer took).
null. If you later edit the audience so a picked column no
longer exists, saving the action asks you to pick the columns again.
Duplicates and retries
A429, a 5xx or a dropped connection is retried, and a send that still fails is tried again at later refreshes,
up to 5 attempts in all. When a batch is retried, every request in it is sent again, including ones your receiver
already accepted.
delivery_id is built from the action, the refresh, the event and the people in the request, so a retried
request carries the same delivery_id (also in X-EF-Delivery) and any other request gets a new one. To ignore
duplicates:
- Store each
delivery_idyou have processed. - When a request arrives with a
delivery_idyou already have, answer200and do nothing else. - Answer
2xxonly after you have stored the people. Any other status counts as a failed send.
email_hash plus event, so the same person entering twice in
a row is still one record.